EBTKS Getting Started
What’s in the box
Depending on how you ordered your EBTKS, it is supplied as just the assembled Printed Circuit Board (PCB) or the PCB with Guide Rails attached
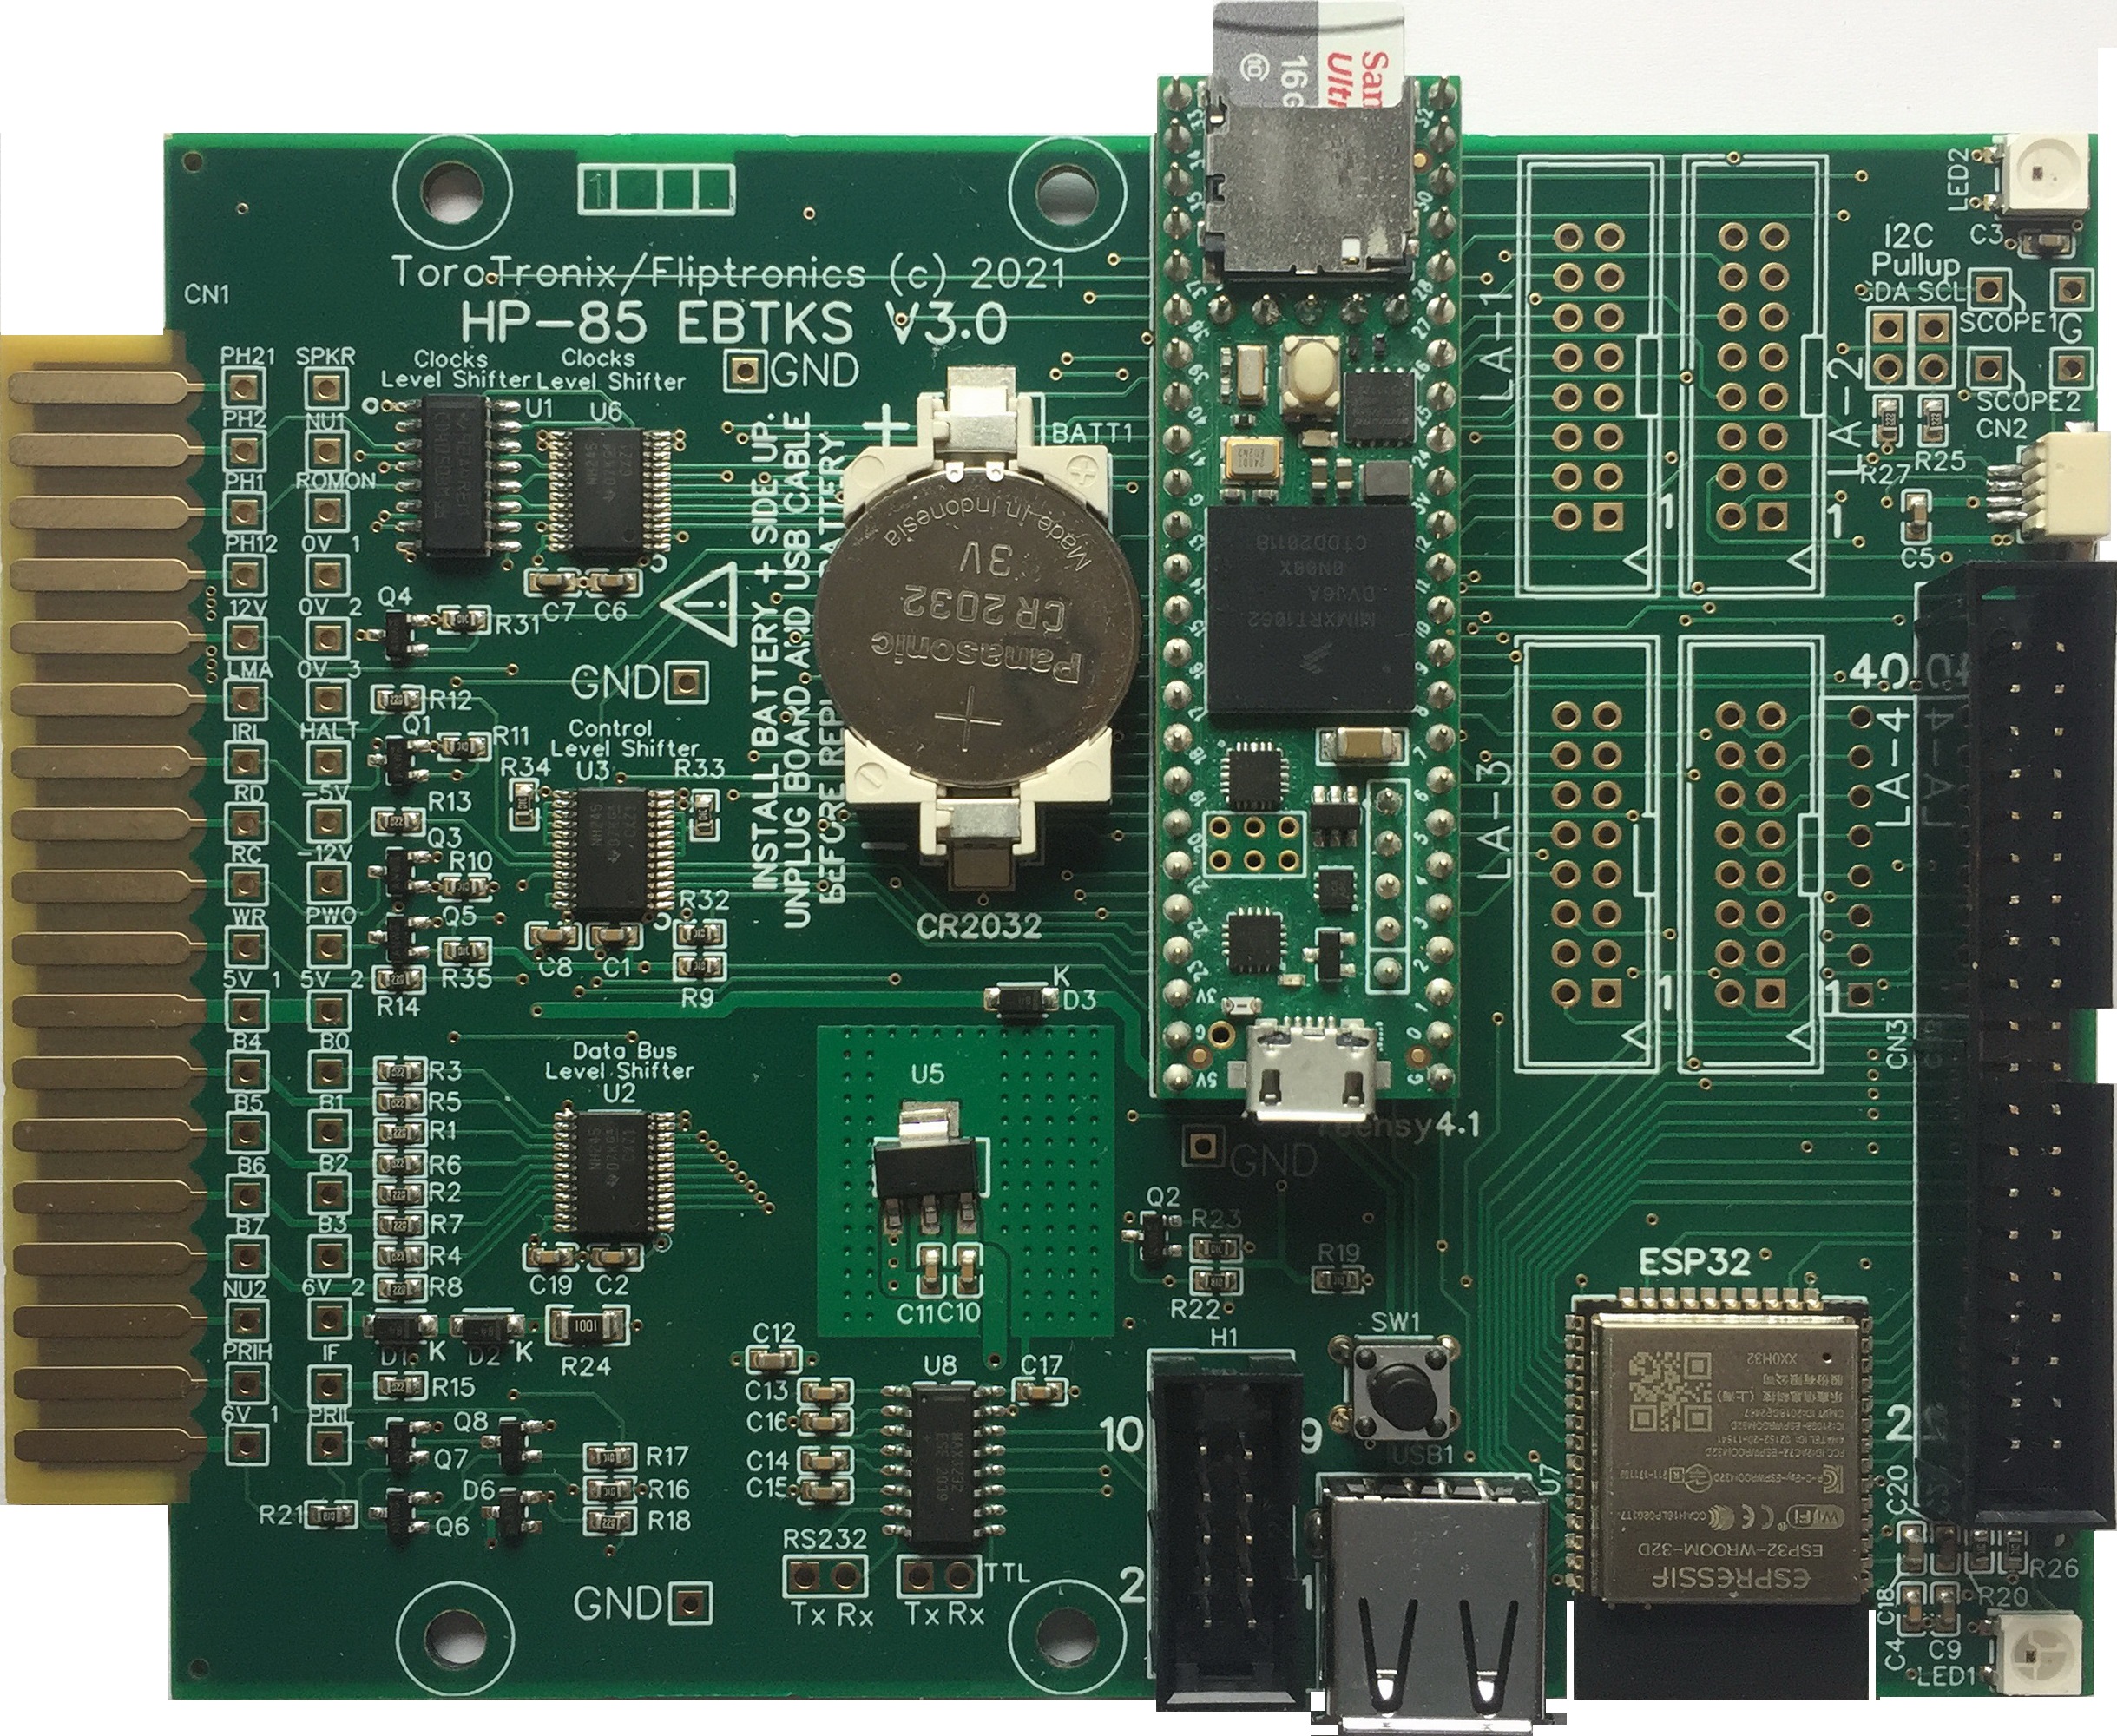
EBTKS without Guide Rails
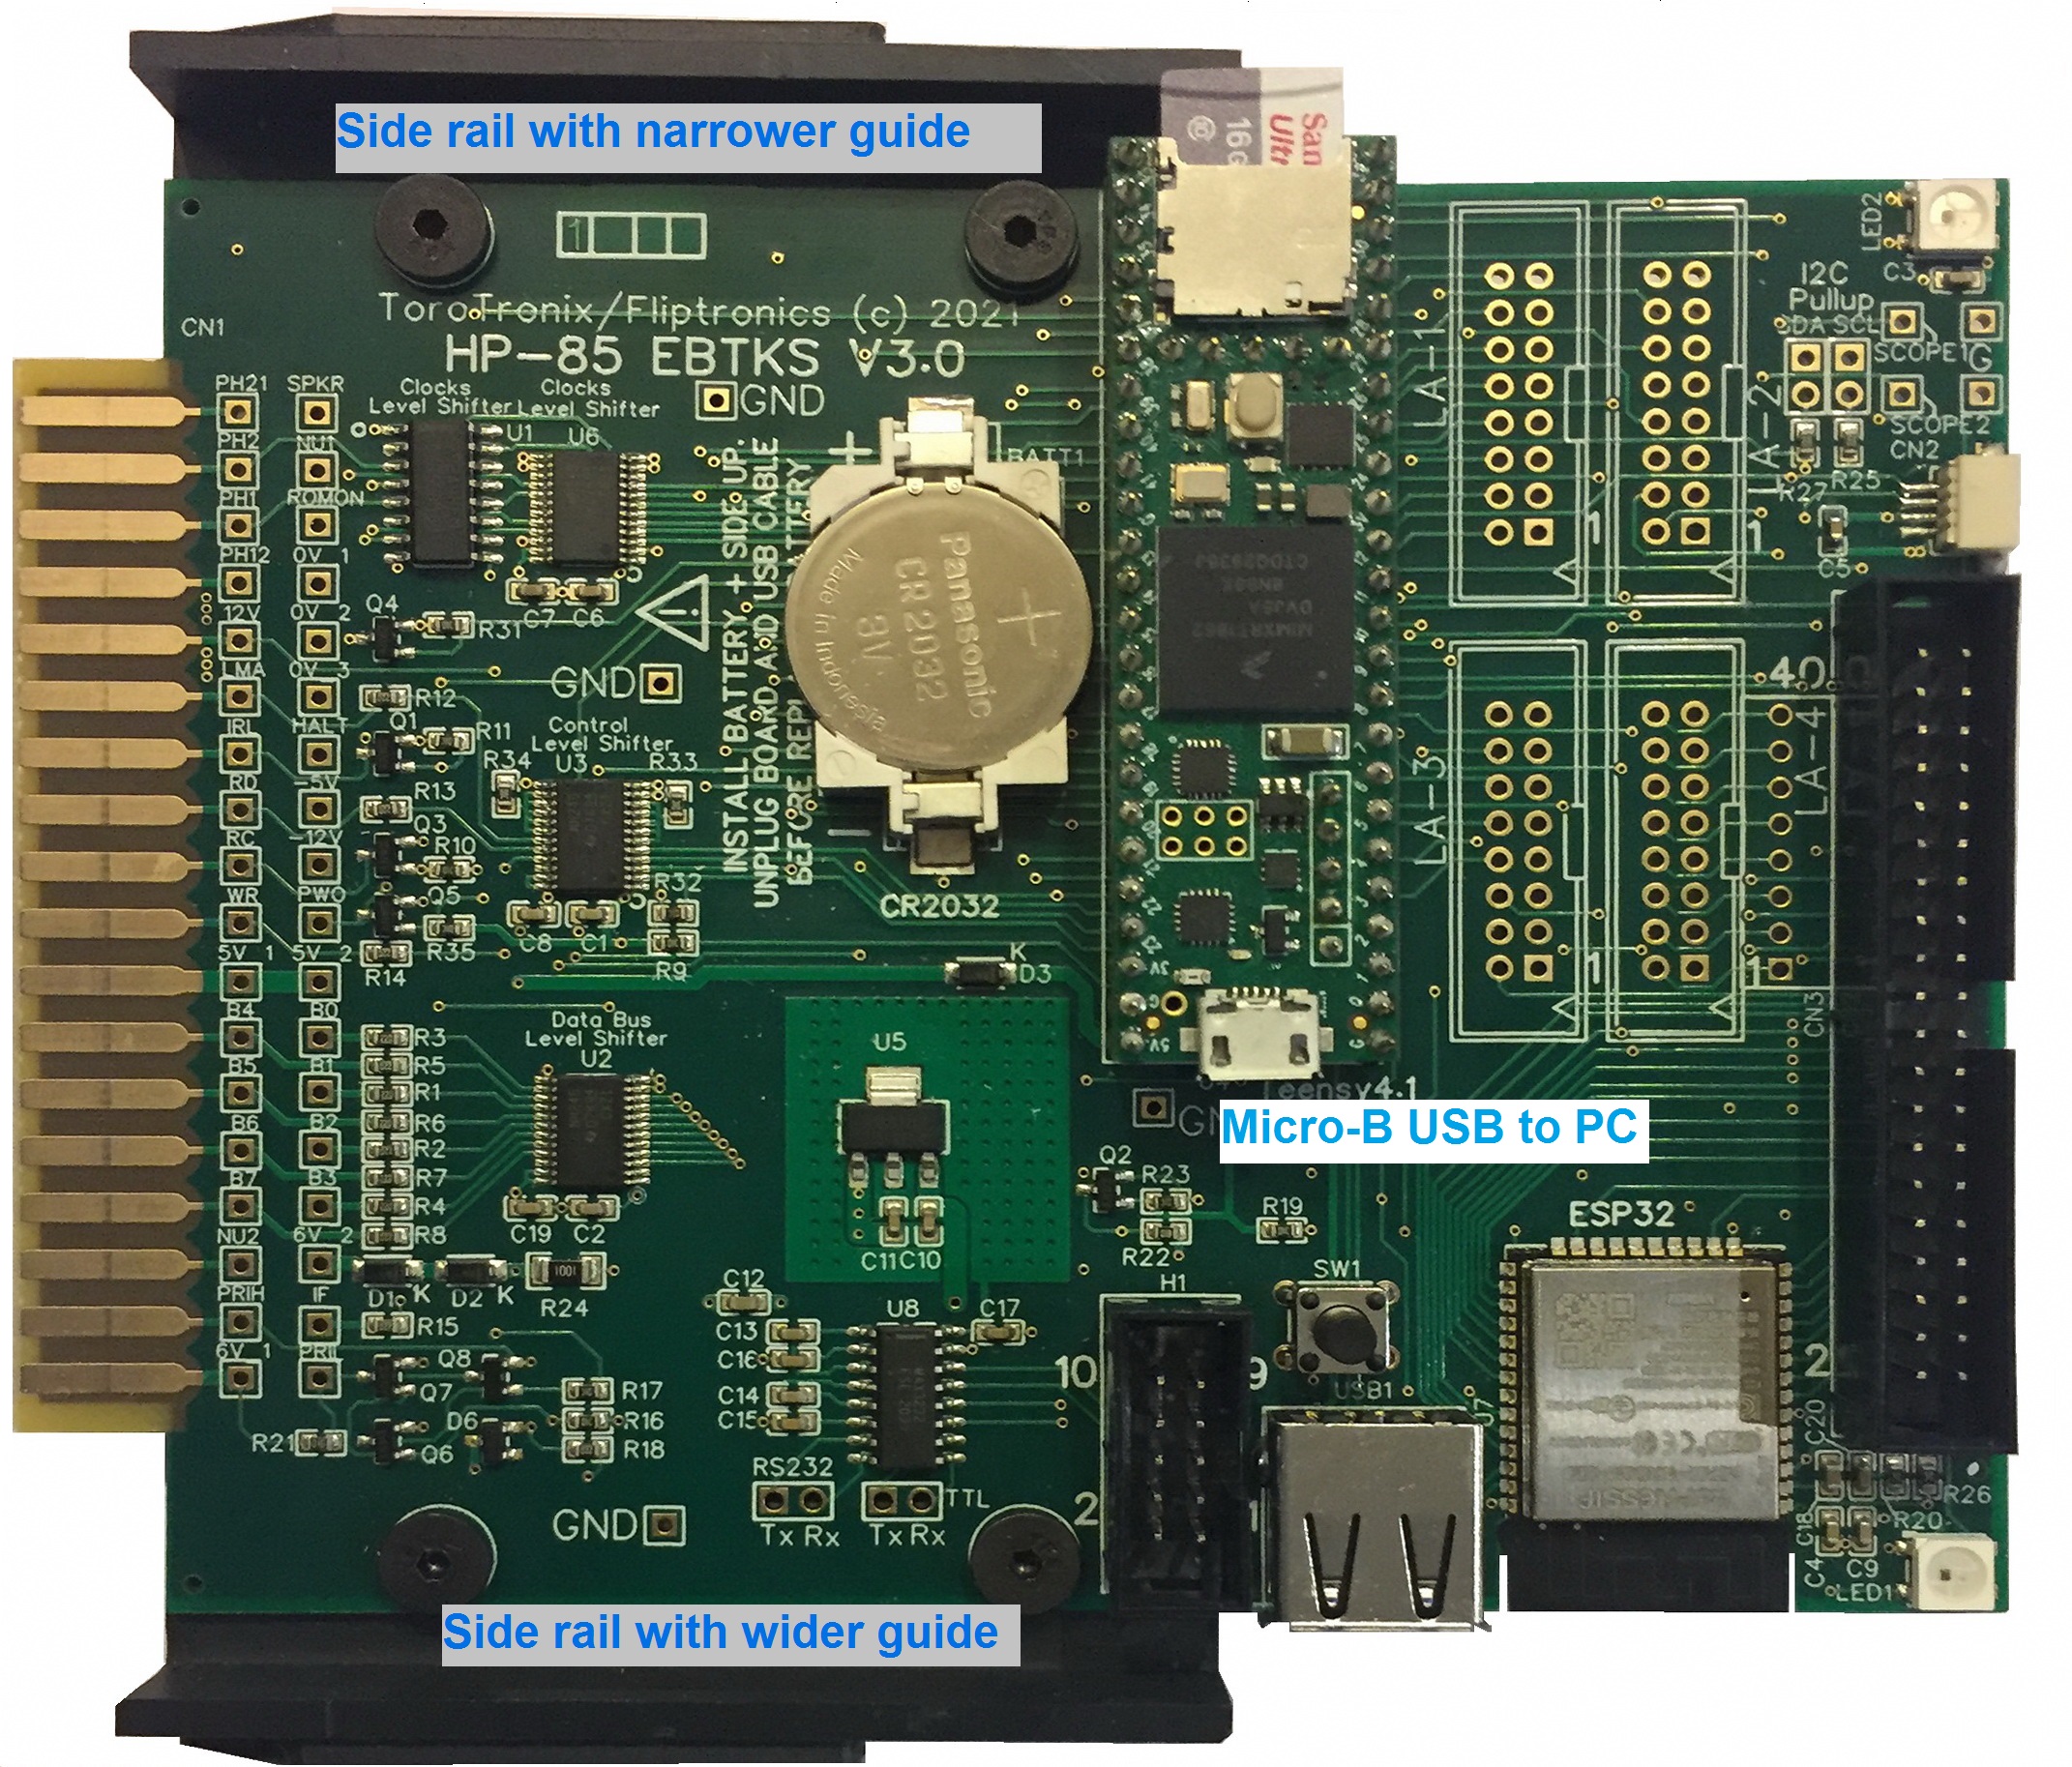
EBTKS with Guide Rails
Guide Rails
PVC or HDPE plastic guide rails are CNC machined out of gray PVC type 1 or black HDPE. The left and right guide rails are sized to match the guide slots in the backplane of your Series80 computer. These come standard with your EBTKS. They are easily removed if you want to use a 3D printed case.

Left Guide Rail
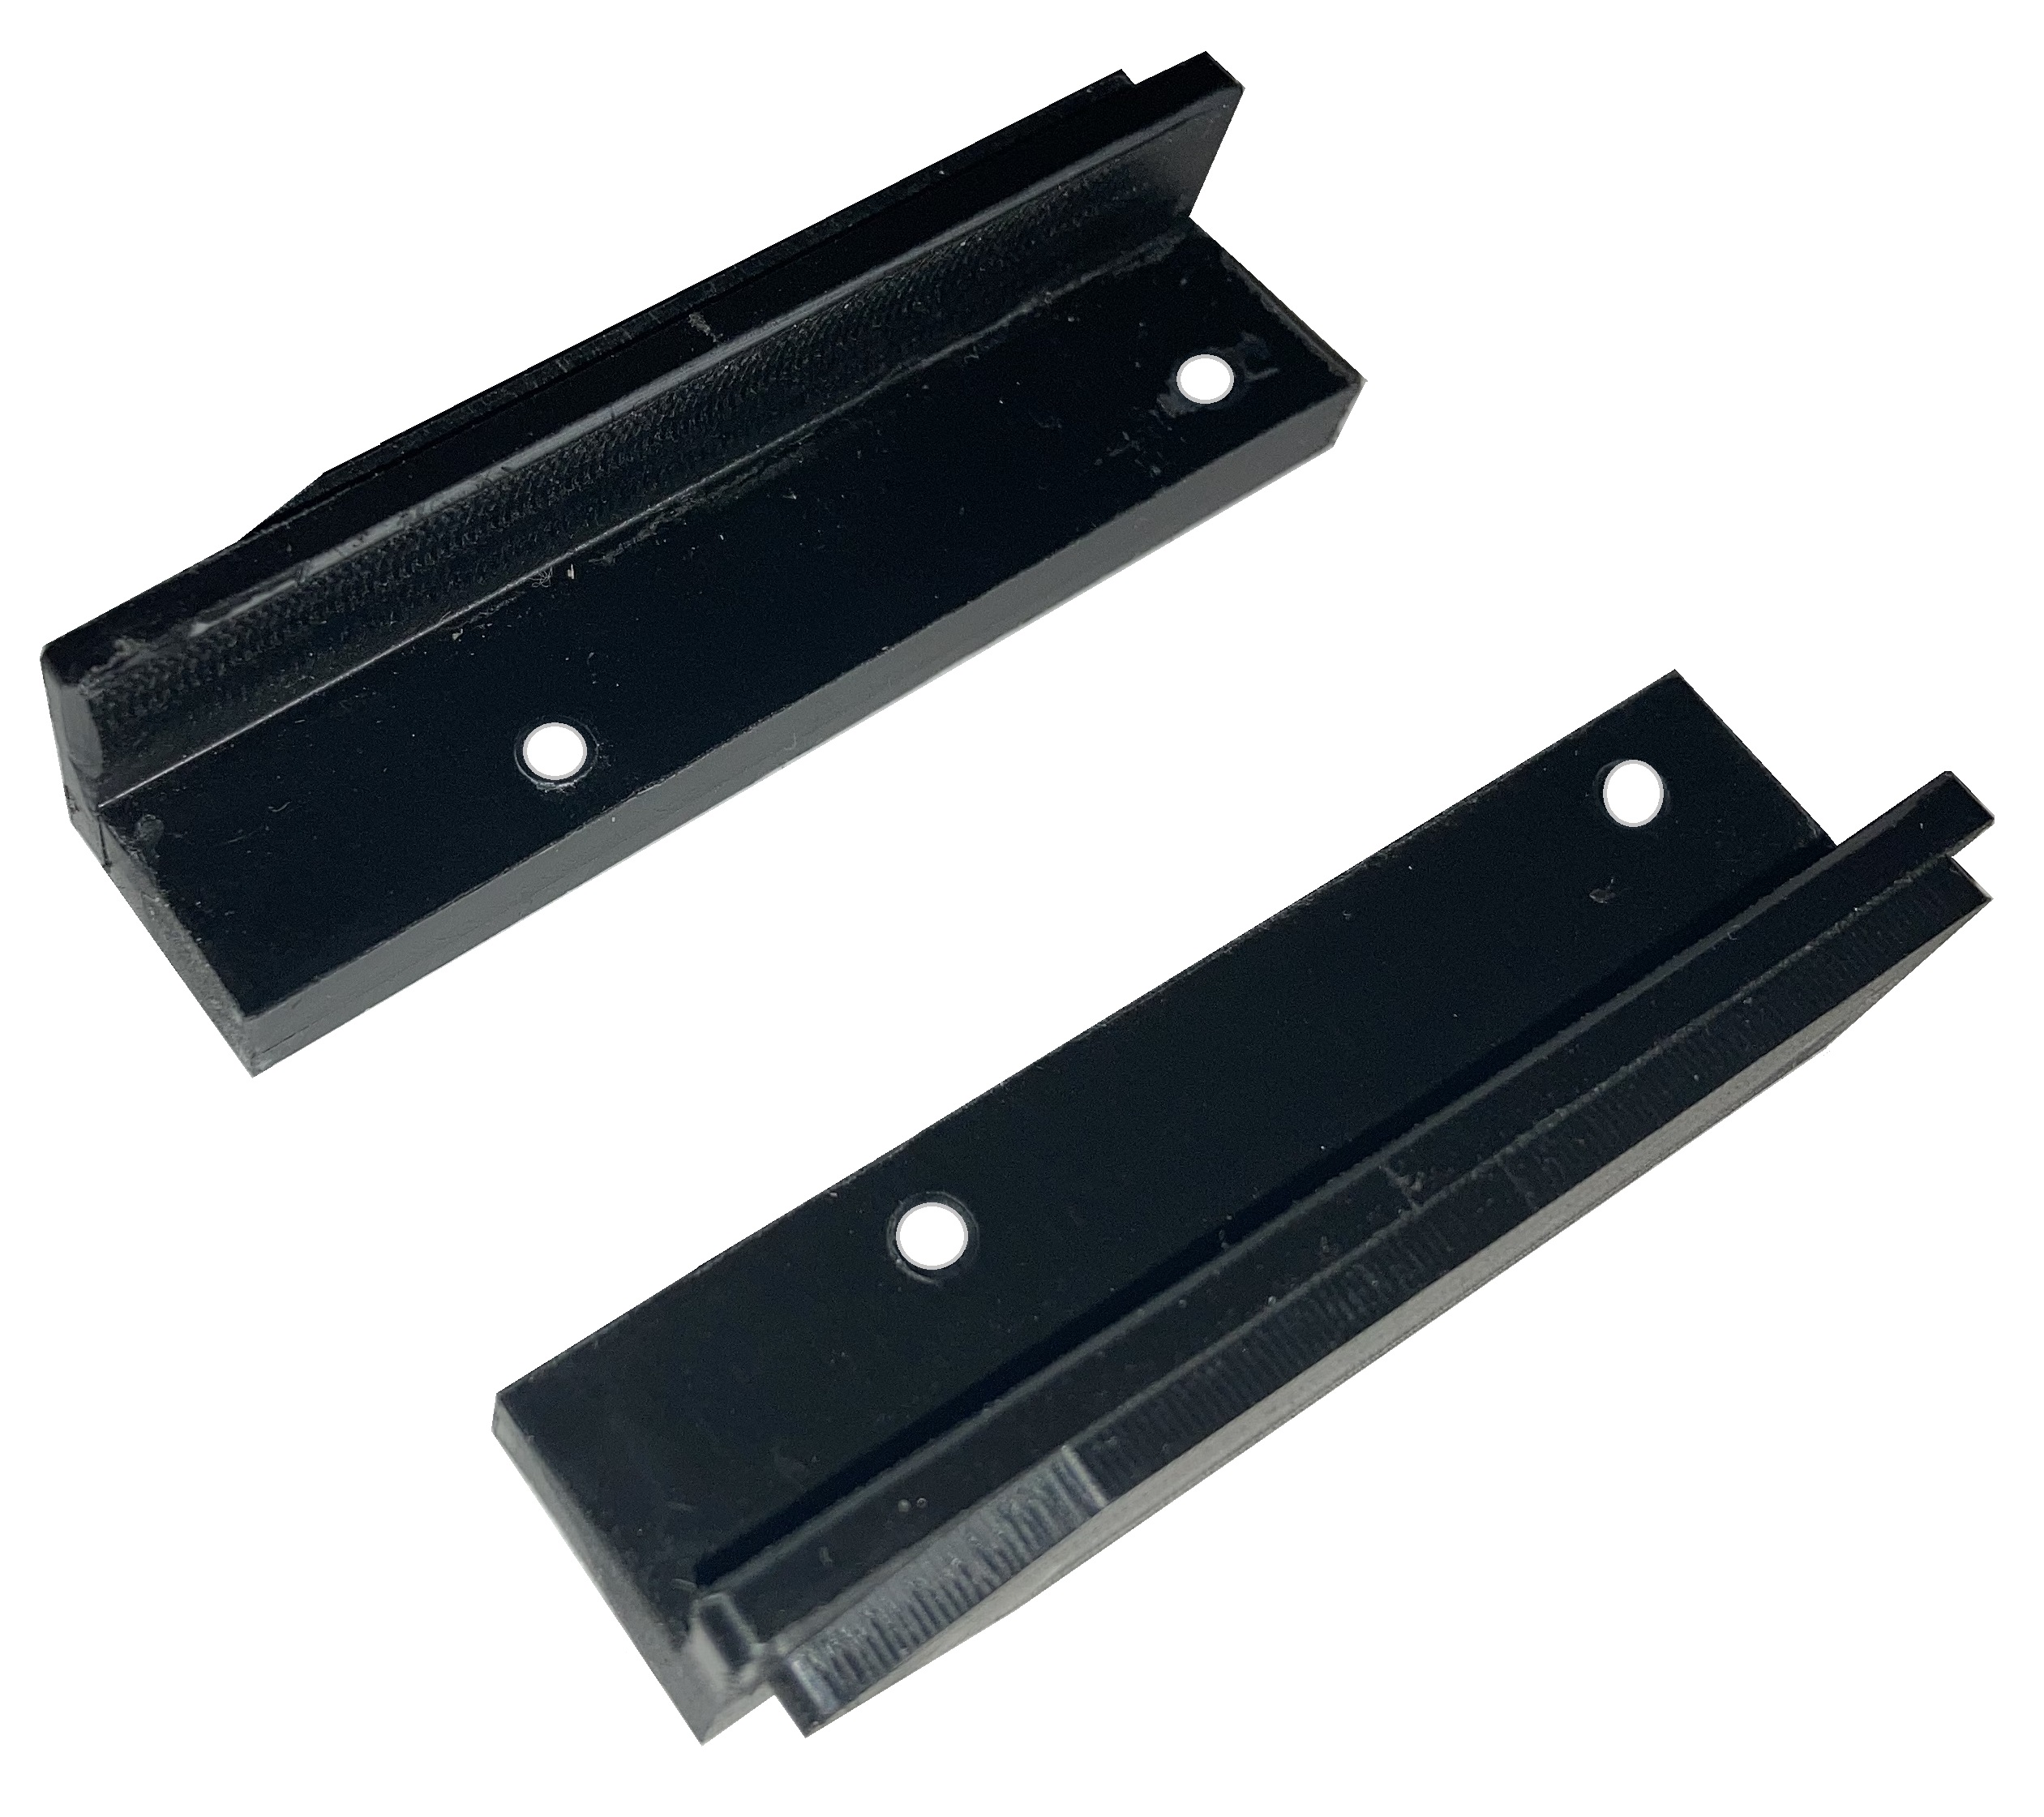
Both Guide Rails
3D Printed Case
The design files for a 3D printed case are now available on this page. Getting the case printed will be your responsibility, the EBTKS team does not provide these cases
There will be a 16 GB MicroSD Card preloaded with software installed in the Teensy 4.1 module. In case you may want to do additional development on the Teensy module, or maybe remove it from EBTKS to use in another project, the standard Teensy 4.1 reference card is included. If you do unplug the Teensy module (never needed for normal EBTKS use), do it very carefully by slowly levering up each end of the module with a plastic tool, to avoid damaging the module and the PCB beneath it. The pins on the Teensy 4.1 module are very thin and easily bent or broken.
EBTKS is Pre Configured
Based on information you provided at the time of your order, EBTKS has been preconfigured to match your system. This is done with the CONFIG.TXT file which you can edit to change configurations. Please note that this file has a very specific format, and if you edit it, you must verify that you do not mess up the formatting. On the just referenced page, there is information about a syntax checker that is easy to use, to check your changes. There are no user jumpers on EBTKS, every configuration option is controlled by CONFIG.TXT, which is located in the root directory of the MicroSD Card.
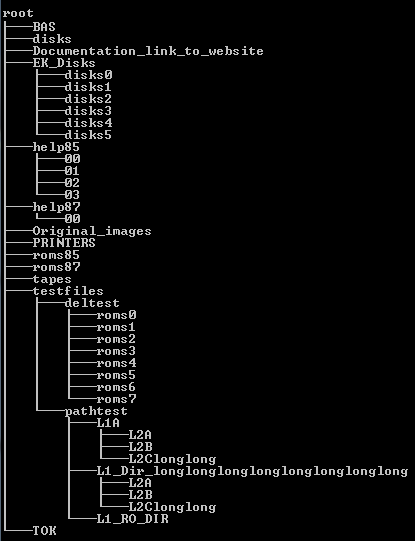
MicroSD Card Directory Tree
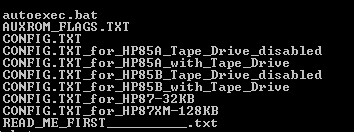
MicroSD Card Root Directory
Moving EBTKS to a different computer
In the root directory, as well as the CONFIG.TXT file, there are 6 other configuration files, with hopefully informative names. If you want to change the computer your EBTKS is plugged into another computer that is not the same model and same configuration, the CONFIG.TXT file will need to be changed to match the new computer. The easiest way to do this is to delete the CONFIG.TXT file, and make a copy of one of the other 6 files, naming the copy CONFIG.TXT. You should never edit these 6 files, only copies of them. If you do mess things up, you can always get a pristine copy of the MicroSD Card image from the Download page
Time to start playing
(All of the following assumes the standard MicroSD Card file set. The example screen displays are from a HP85B.)
EBTKS is preconfigured to provide 5 floppy disk drives and one 5 MB Winchester drive (all emulated, the actual storage is files on the MicroSD Card).
When you start your computer with EBTKS for the first time, it will show the following two screens (the second one by using the Shift-Roll to scroll up)
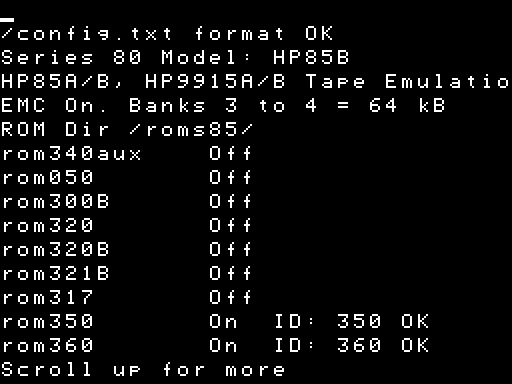
First page
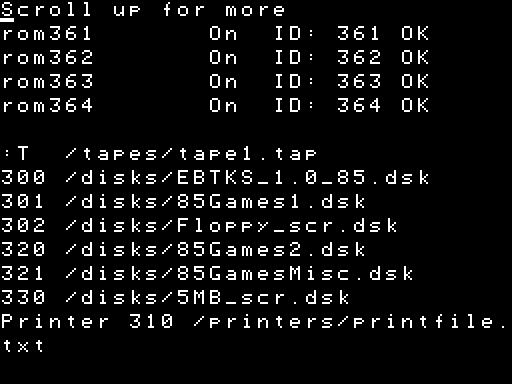
Second page
These two pages show how the CONFIG.TXT file was processed as the system started, and you should review the display carefully if you make any changes to CONFIG.TXT . Briefly it shows the following
Starting on the first page above, for which model of Series80 computer the CONFIG.TXT file is configured.
Whether emulation of the tape drive is enabled (the original goal of EBTKS). Note that for tape drive emulation to work correctly, the physical tape drive must be disabled by unplugging the two flat flex cables.
To help you decide about this, please see Tape Drive Strategies with EBTKSWhether EBTKS provides extended memory, and how much
Whether ROMs are loaded for HP85 (or 83 or 9915) or for HP86/87
Which ROMs are enabled
Seen on the second page above, the association between Mass Storage Unit Specifiers (abbreviated in HP Mass Storage Manual as msus) and the files that store the Floppy or Winchester disk image.
This startup display can be disabled in the CONFIG.TXT file by changing the line:
"CRTVerbose": true,
to
"CRTVerbose": false,
The disk image file associated with msus 300 is the initial default Mass Storage device (in the EBTKS situation, an emulated device), which is shown on the second page above is /disks/EBTKS_1.0_85.dsk
Typing CAT will list the contents of this emulated floppy disk (/disks/EBTKS_1.0_85.dsk)
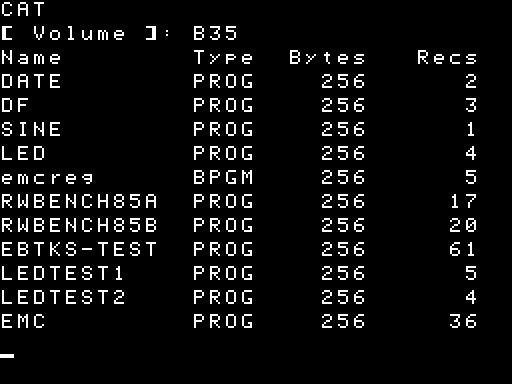
Catalog of msus 300
Some of these programs will run without problems, and some will need editing to match your computer’s configuration
Here are some simple examples:
The DATE program retrieves the current time and date from the on-board battery backed up clock. It is set to California time, PDT time zone. It uses a new keyword DATETIME . LIST the program to see how it works.
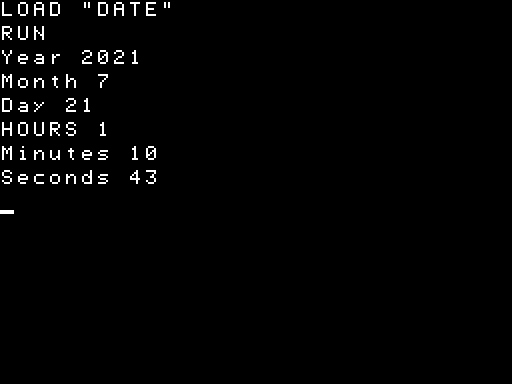
The DATE Program
The DF program shows the amount of total unused disk space and the largest unused space. (in a PACKed disk, these are the same). This is an example of a program that needs to be edited depending on your system. On an HP85B, which always has at least a small EDISK, no editing is needed. On all other systems, if there is no EDISK, line 110 must be changed as shown in the third image below.
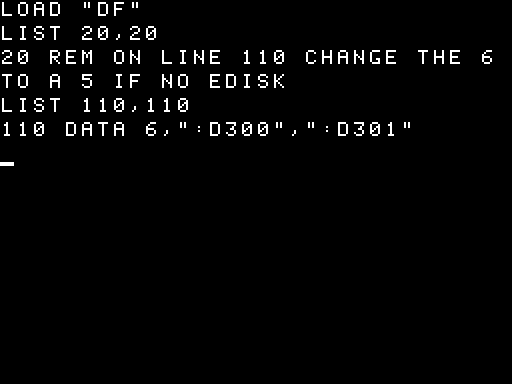
The DF Program (Disk free space)
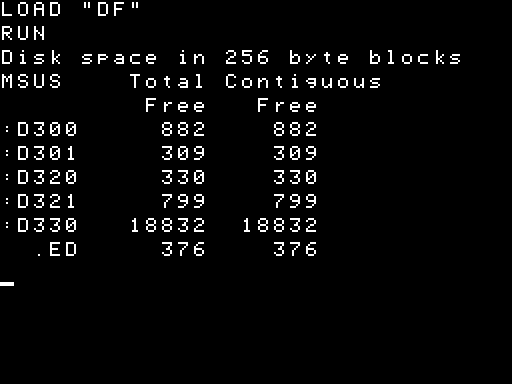
Running DF on an HP85B
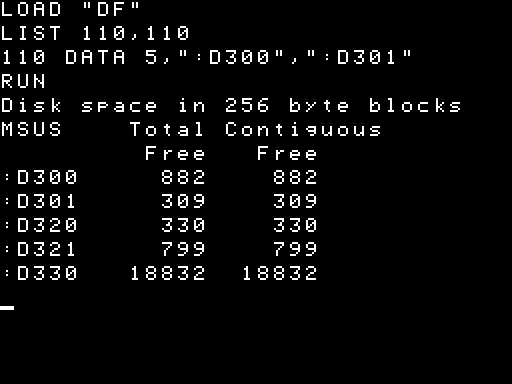
Running DF on an HP85A, after editing of line 110
The SINE program is as boring as you would expect it to be, and is not worthy of a screen capture.
The programs are used to test the two RGB LEDs on the back edge of EBTKS.
You can turn the LEDs off with SETLED 3,0,0,0
LED
LEDTEST1
LEDTEST2
Two disk speed benchmarking programs
RWBENCH85A
RWBENCH85B  (this can also be used on HP86 and HP87)
were used to get the performance data presented at the end of this forum article . The program will probably need editing depending on whether you have EDISK enabled, and whether you have an HP9121 floppy disk drive attached via an HPIB interface with a msus of 700
The EBTKS-TEST program checks multiple parts of EBTKS, and does not need any editing. On an HP85B it takes about 45 seconds to run. Here are the expected two screen pages:

Running EBTKS-TEST on an HP85B, page 1
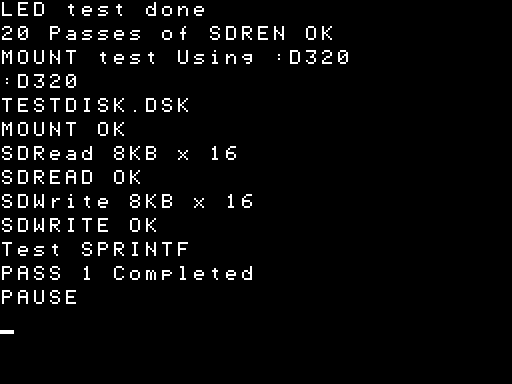
Running EBTKS-TEST on an HP85B, page 2
Pressing CONT will repeat the test and increment the PASS count.
EBTKS has two file systems
All of EBTKS disk storage is located on a micro SD card that (depending on when it was shipped) is either 16 or 32 GB. For the 16 GB SD card, this is equivalent to about 70,000 floppy disks. Twice as much on the 32 GB SD cards.
The Emulated Disks file system
For complete backward compatibility to the original HP 3.5” and 5.25” floppy disk drives, EBTKS has emulated disks. If we think about what is stored on a floppy disk, it comprises two types of things:
The directory area that contains directory entries:
The names of the files stored on the disk
The location for each file on the disk
The size of each file on the disk
The default 3.5”/5.25” Floppy Disk format supports 42 directory entries
and maybe other information about each file, such as:
File type
File date
Access permissions
The files that are stored on the disk, and are named in the directory area.
EBTKS implements each emulated disk with a single file that contains the directory area (at the beginning of the file) and the remainder of the file holds the files that the disk represents. Each such emulate disk file typicaly has a name that is relevant, and a file extension of .dsk . These files are stored on the micro SD card in a directory named /disks/ . If you connect the micro SD card to a PC, and look at the /disks/ directory, you should see the following.

Each 264 kB file is an image of a floppy disk, that contains with the directory and files of the emulated disk. As you can see, the emulated disk file size is fixed. That’s because all the storage that a floppy disk can store is fixed by the type of disk, and the formatting.
The mapping between these files and the way a Series-80 computer accesses
them is
described here Disk Drives
On Series-80 computer, disks are either the default drive, where only the file name is needed to refer to a file, or non-default drives, where a MSUS or logical disk name must be appended to the file name.
For example, if the default disk is “:D300” (which is the EBTKS default), all of the following will reference the same program on emulated disk EBTKS_1.0_85.dsk (which is assigned to :D300 in the CONFIG.TXT file:
Command |
Notes |
|---|---|
LOAD “LEDTEST2” |
no need to specify which floppy drive, as :D300 is the default |
LOAD “LEDTEST2:D300” |
access a specific floppy drive, regardless of which drive is the default |
LOAD “LEDTEST2.B35” |
access an emulated floppy drive by its volume name regardless of the MSUS |
If you do a STORE to the default emulated disk, for example:
STORE “LEDTEST3”
it will change the content of /disks/EBTKS_1.0_85.dsk , but the size of
this emulated disk file will not change.
To migrate an emulated disk from
one EBTKS to another, or to make a backup, just copy the EBTKS_1.0_85.dsk file
(or which ever other emulated disk file you want to migrate/backup).
All of the standard Series-80 BASIC commands that can be used with physical HP floppy disks, can be used with the emulated disks.
If you want to change the associations between a given MSUS and an emulated disk file, please see this section More on MOUNT
Most of the HP Software PACs can be found on the micro SD card,
starting at
this directory /EK_Disks/disks0/
For each file that is 264 kB, it can be copied to /disks , and the file extension can be changed to .dsk . It can then be referenced either by the MOUNT command or by editing the CONFIG.TXT file.
Bigger, Better, Faster, Stronger File System
A little videoNote the tape drive at 1:02 and a CD disk at 1:20
Another little videoEBTKS introduces a second file system that directly reads and writes to the SD card, and does not use emulated disks. None of the standard Series80 basic keywords (like LOAD and STORE) work with this file system, instead EBTKS AUXROMs provides 38 new keywords, all of which start with SD. For example SDCAT, SDLOAD and SDSTORE. They are all documented here AUXROM Keywords.
This second file system uses a FAT32 format, that is compatible with PC file systems and has most of the same characteristics:
File names can be as long as you like
File names can have extensions
File names have date and time stamps
Sub-Directories are supported, and can be nested
Sub-Directory names can be as long as you like
Files can be as long as you like, within the limit of the available storage on the SD card
Read and write positioning (SDSEEK) has single character resolution
Directory catalogs (SDCAT) include time/date stamps, and some attributes
Reading and writing within this file system is faster than the emulated disks
The new keywords include ones for traversing the directory with pattern matching on the filename
As you are directly accessing the SD card’s file system, files that are written can be easily accessed by connecting the SD card to a PC/Laptop computer
There are many capabilities of this file system that have no equivalent within the emulated file system
The big picture with two file systems
As previously explained, the emulated filesystem implements emulated floppy drives and emulated floppy disks. Thes emulated disks are stored as files on the SD card. So, that means the emulated floppy disks appear as files within the more capable second file system.
for example, try this command: SDCAT /DISKS/

SDCAT example
This shows the files currently in the /DISKS/ directory, which are the floppy disk images for the emulated file system.
As the second file system accesses the whole of the SD card, there is only one SD card plugged in, so it is always the default for SDxxx keywords, and the MSUS$ type selectors used for the emulated file system have no equivalent. Maybe the closest equivalence is using sub-directories to organize your files into logical groups.
Accessing Software PACs
The file 85MathPac is a disk image. It contains directory sectors at the beginning of the file, followed by the programs/data that are listed in the directory section. It is a byte for byte copy of an actual 3-1/2” single density floppy.
It can be found here: SDCAT /EK_DISKS/DISKS0/85M*

Find 85MathPac
As all the disk images in the /EK_DISKS/ subdirectory are your reference versions, we should make a copy of this file and put it in the /DISKS/ directory, and add the .dsk file extension. (adding the .dsk is not strictly needed, but it is a good convention to follow to remind you that these files represent emulated disks)
SDCOPY “/EK_Disks/disks0/85MathPac” , “/disks/85MathPac.dsk”
SDCAT /disks/85*
MOUNT “:D302” , “/disks/85MathPac.dsk”,0

Copy and Mount 85MathPac
You will probably also need to change the default drive:
MSI “:D302”
When you are done using 85MathPac.dsk, you can restore “:D300” to be the default drive:
MSI “:D300”
What else is on the MicroSD Card
The Directory Tree diagram near the top of
this page shows many directories.
This is documented in detail here A Guided tour of the MicroSD Card
Here is a brief summary.
root |
covered above |
BAS |
BASIC programs in ASCII source form. |
disks |
This is where the emulated disk image files reside, see above for an explanation |
EK_Disks |
This is a copy of all the disk images found in Everett Kaser’s Series80 emulator |
help85 |
All the help text for HP85A/B are in this subtree. This is still a work in progress |
help87 |
All the help text for HP86A/B and 87/87XM are in this subtree. This is still a work in progress |
Original_images |
Disk and tape images of blank media. Used when creating a new Disk or Tape |
Printers |
Output that would normally go to the printer can be redirected to a file in this directory |
roms85 |
All of the available ROMs compatible with HP85A/B |
roms87 |
All of the available ROMs compatible with HP86A/B and HP87/87XM |
tapes |
This is where the tape image files reside. unused on HP86A/B and 87/87XM |
testfiles |
A test directory used during development, and by EBTKS-TEST |
TOK |
BASIC programs in tokenized form. Functionally the same as saved programs in the emulated disks. |
EBTKS Configuration
The checklist page that is included with your EBTKS lists the
initial settings for your EBTKS. These are included in the CONFIG.TXT
file that is in the root directory of the provided SD Card.
See Working with CONFIG.TXT for details of how to make changes
to this file.
The checklist also lists the expected configuration of your system,
with regard to the following:
Is the tape drive connected (for HP85A and HP85B)
It is expected that there is no ROM module or other ROM card installed as EBTKS should be able to provide all the ROMs you need
On HP85A, don’t install an extra 16 kb memory module as EBTKS can provide this memory.
On HP85B, EMC memory modules can be used for EDisk. See EMC for details.
Typically, a HP85B has 3 option ROMs pre-installed on the main board:
I/O (Octal 300 )
Mass Storage (Octal 320)
EDisk (Octal 321)
Do not enable these ROMs on EBTKS on an HP85B system, as it will cause incorrect operation.
A similar constraint exists for HP86A/B and HP87/87XM pre-installed ROMs.EBTKS uses module select code 3 for an emulated HPIB interface that is the gateway to emulated floppy disk drives and emulated hard disk drives. It is also used for an emulated printer Therefore, if you have a real HPIB interface module plugged in for
Other real disk drives
Test and Measurement equipment
Data acquisition
Printers
Plotters
Emulated disks that connect over real HPIB
the real HPIB interface must not use select code 3. By default, HP ships HPIB interface modules with select code 7.
As you will see on the Working with CONFIG.TXT page you can make edits to the file by putting the SD Card into a PC and using a simple text editor like notepad.
This allows changing the initial disk and tape drive assignments to various LIF image files. Even though it looks like you can add new additional sections following the existing format, please don’t, as things will probably break. At a later time, hopefully an EBTKS owner will write a utility program that runs on the HP85 and automates simple changes to the CONFIG.TXT file.
Note:
CONFIG.TXT is an ASCII text file in JSON format. Editors like WordPad and MSWord add additional information like character height, font selection, and other formatting control. This will corrupt the file.
While Notepad can be used for editing CONFIG.TXT, another far superior free editor that does not add formatting is Notepad++ which can be found with Google Search.
For Linux/Unix systems, suitable editors include VI, VIM, EMACS, Nano, Atom, Gedit.
A few New Keywords
The following are useful initial keywords to check the firmware and AUXROM versions, and which ROMs have been loaded. These are all just typed at the BASIC prompt. See AUXROM Keywords for the full list of over 57 new keywords, with more detailed explanations and examples
- AUXREV
Returns the AUX ROMs revision# (from ROM 361)
- EBTKSREV$
Returns a string containing date and time of building the EBTKS firmware
- LISTROMS 0
Displays all the possible ROMs for HP85/86/87 and their Octal/Decimal ID number
- LISTROMS 1
Displays currently installed ROMs and their Octal/Decimal ID number. AUXROMS are loaded as a set with Octal IDs 361, 362, 363, 364. LISTROMS will only list the first one
Links
Connecting the serial diagnostic port
Highlights
There are several help pages that list the available commands. Just type the number 0 to 6 and enter to get a short help page.
The serial diagnostic port Help
This section of EBTKS is likely to change since it is primarily a debug tool for the EBTKS developers
Here are the 7 pages of help
EBTKS> 0

EBTKS Control commands - not case-sensitive

0     Help for the help levels
1     Help for Display Information
2     Help for Diagnostic commands
3     Help for Directory and Time/Date Commands
5     Help for Developers
6     Help for Demo
EBTKS> 1
Commands to Display Information
show -----    Show commands have a parameter after exactly 1 space
     log      Show the System Logfile
     boot     Show the messages from the boot process, sent to Serial port
     CRTboot  Show the messages sent to the CRT at startup
     config   Show the CONFIG.TXT file
     media    Show the Disk and Tape assignments
     mb       Display current mailboxes and related data
     CRTVis   Show what is visible on the CRT
     CRTAll   Show all of the CRT ALPHA memory
     key85_O  Display HP85 Special Keys in Octal
     key85_D  Display HP85 Special Keys in Decimal
     key87_O  Display HP87 Special Keys in Octal
     key87_D  Display HP87 Special Keys in Decimal
     other    Anything else is a file name path
EBTKS> 2
Commands for Diagnostic
la setup      Set up the logic analyzer
la go         Start the logic analyzer
addr          Instantly show where HP85 is executing
kbdcode       Show key codes for next 10 characters in the keyboard byffer
clean log     Clean the Logfile on the SD Card
sdreadtimer   Test Reading with different start positions
SDCID         Display the CID information for the SD Card
PSRAMTest     Test the 8 MB PSRAM. You probably should do the PWO command when test has finished
ESP32 Prog    Activate a passthrough serial path to program the ESP32
pwo           Pulse PWO, resetting HP85 and EBTKS
EBTKS> 3
Directory and Date/Time Commands
dir tapes     Directory of available tapes
dir disks     Directory of available disks
dir roms      Directory of available ROMs
dir root      Directory of available ROMs
Date          Show current Date and Time
SetDate       Set the Date in MM/DD/YYYY format
SetTime       Set the Time in HH:MM 24 hour format
adj min       The U and D command will adjust minutes
adj hour      The U and D command will adjust houres
U             Increment the time by 1 minute or hour
D             Decrement the time by 1 minute or hour
EBTKS> 4
Commands for Auxiliary programs
EBTKS> 5
Commands for Developers (mostly Philip)
crt 1         Try and understand CRT Busy status timing
crt 2         Fast CRT Write Experiments
crt 3         Normal CRT Write Experiments
crt 4         Test screen Save and Restore
crt 5         Test writing text to HP86/87 CRT
EBTKS> 6
Commands for Demo
graphics test  Set graphics mode first
jay pi         Jay's Pi calculator running on Teensy
Boot logging
Every time EBTKS starts up it creates three logs.
Short list of ROM and Disk Mounts can be sent to the CRT. Can be disabled in CONFIG.TXT from being displayed
A detailed report on the processing of the CONFIG.TXT file. Always sent to the serial diagnostic port.
A similar report to the report that is sent to the serial diagnostic port, is appended to a log file on the MicroSD Card