Updating the EBTKS Firmware
- Notes:
EBTKS Firmware is software that is stored on a Flash chip that is part of the Teensy 4.1 module. This is separate storage from the SD Card that plugs into the Teensy 4.1 module, and holds the file system, emulated tapes and disks, and the Series80 Option ROMs.
This page documents the process for updating the Firmware.
If you are also updating the SD Card contents, that is done by plugging the SD Card into your computer (you may need an adapter from SD Card to USB). The SD Card should be seen as a FAT32 file system, and normal system commands can be used to copy files to and from the SD Card.
Note
If you are using the Micro-B USB port to connect to a terminal emulator to access the diagnostic channel, this connection must be closed for the firmware update process
Teensy 4.1
The core of EBTKS is a Teensy 4.1 from PJRC. A utility program called the Teensy Downloader is used to update FLASH memory on Teensy with the operational firmware. When new features are added to EBTKS or bugs are fixed, a new firmware file will be available on the Downloads page .
The firmware files have a file extension of .HEX
Procedures for doing the update are described below, for Windows, Linux, and Mac computers.
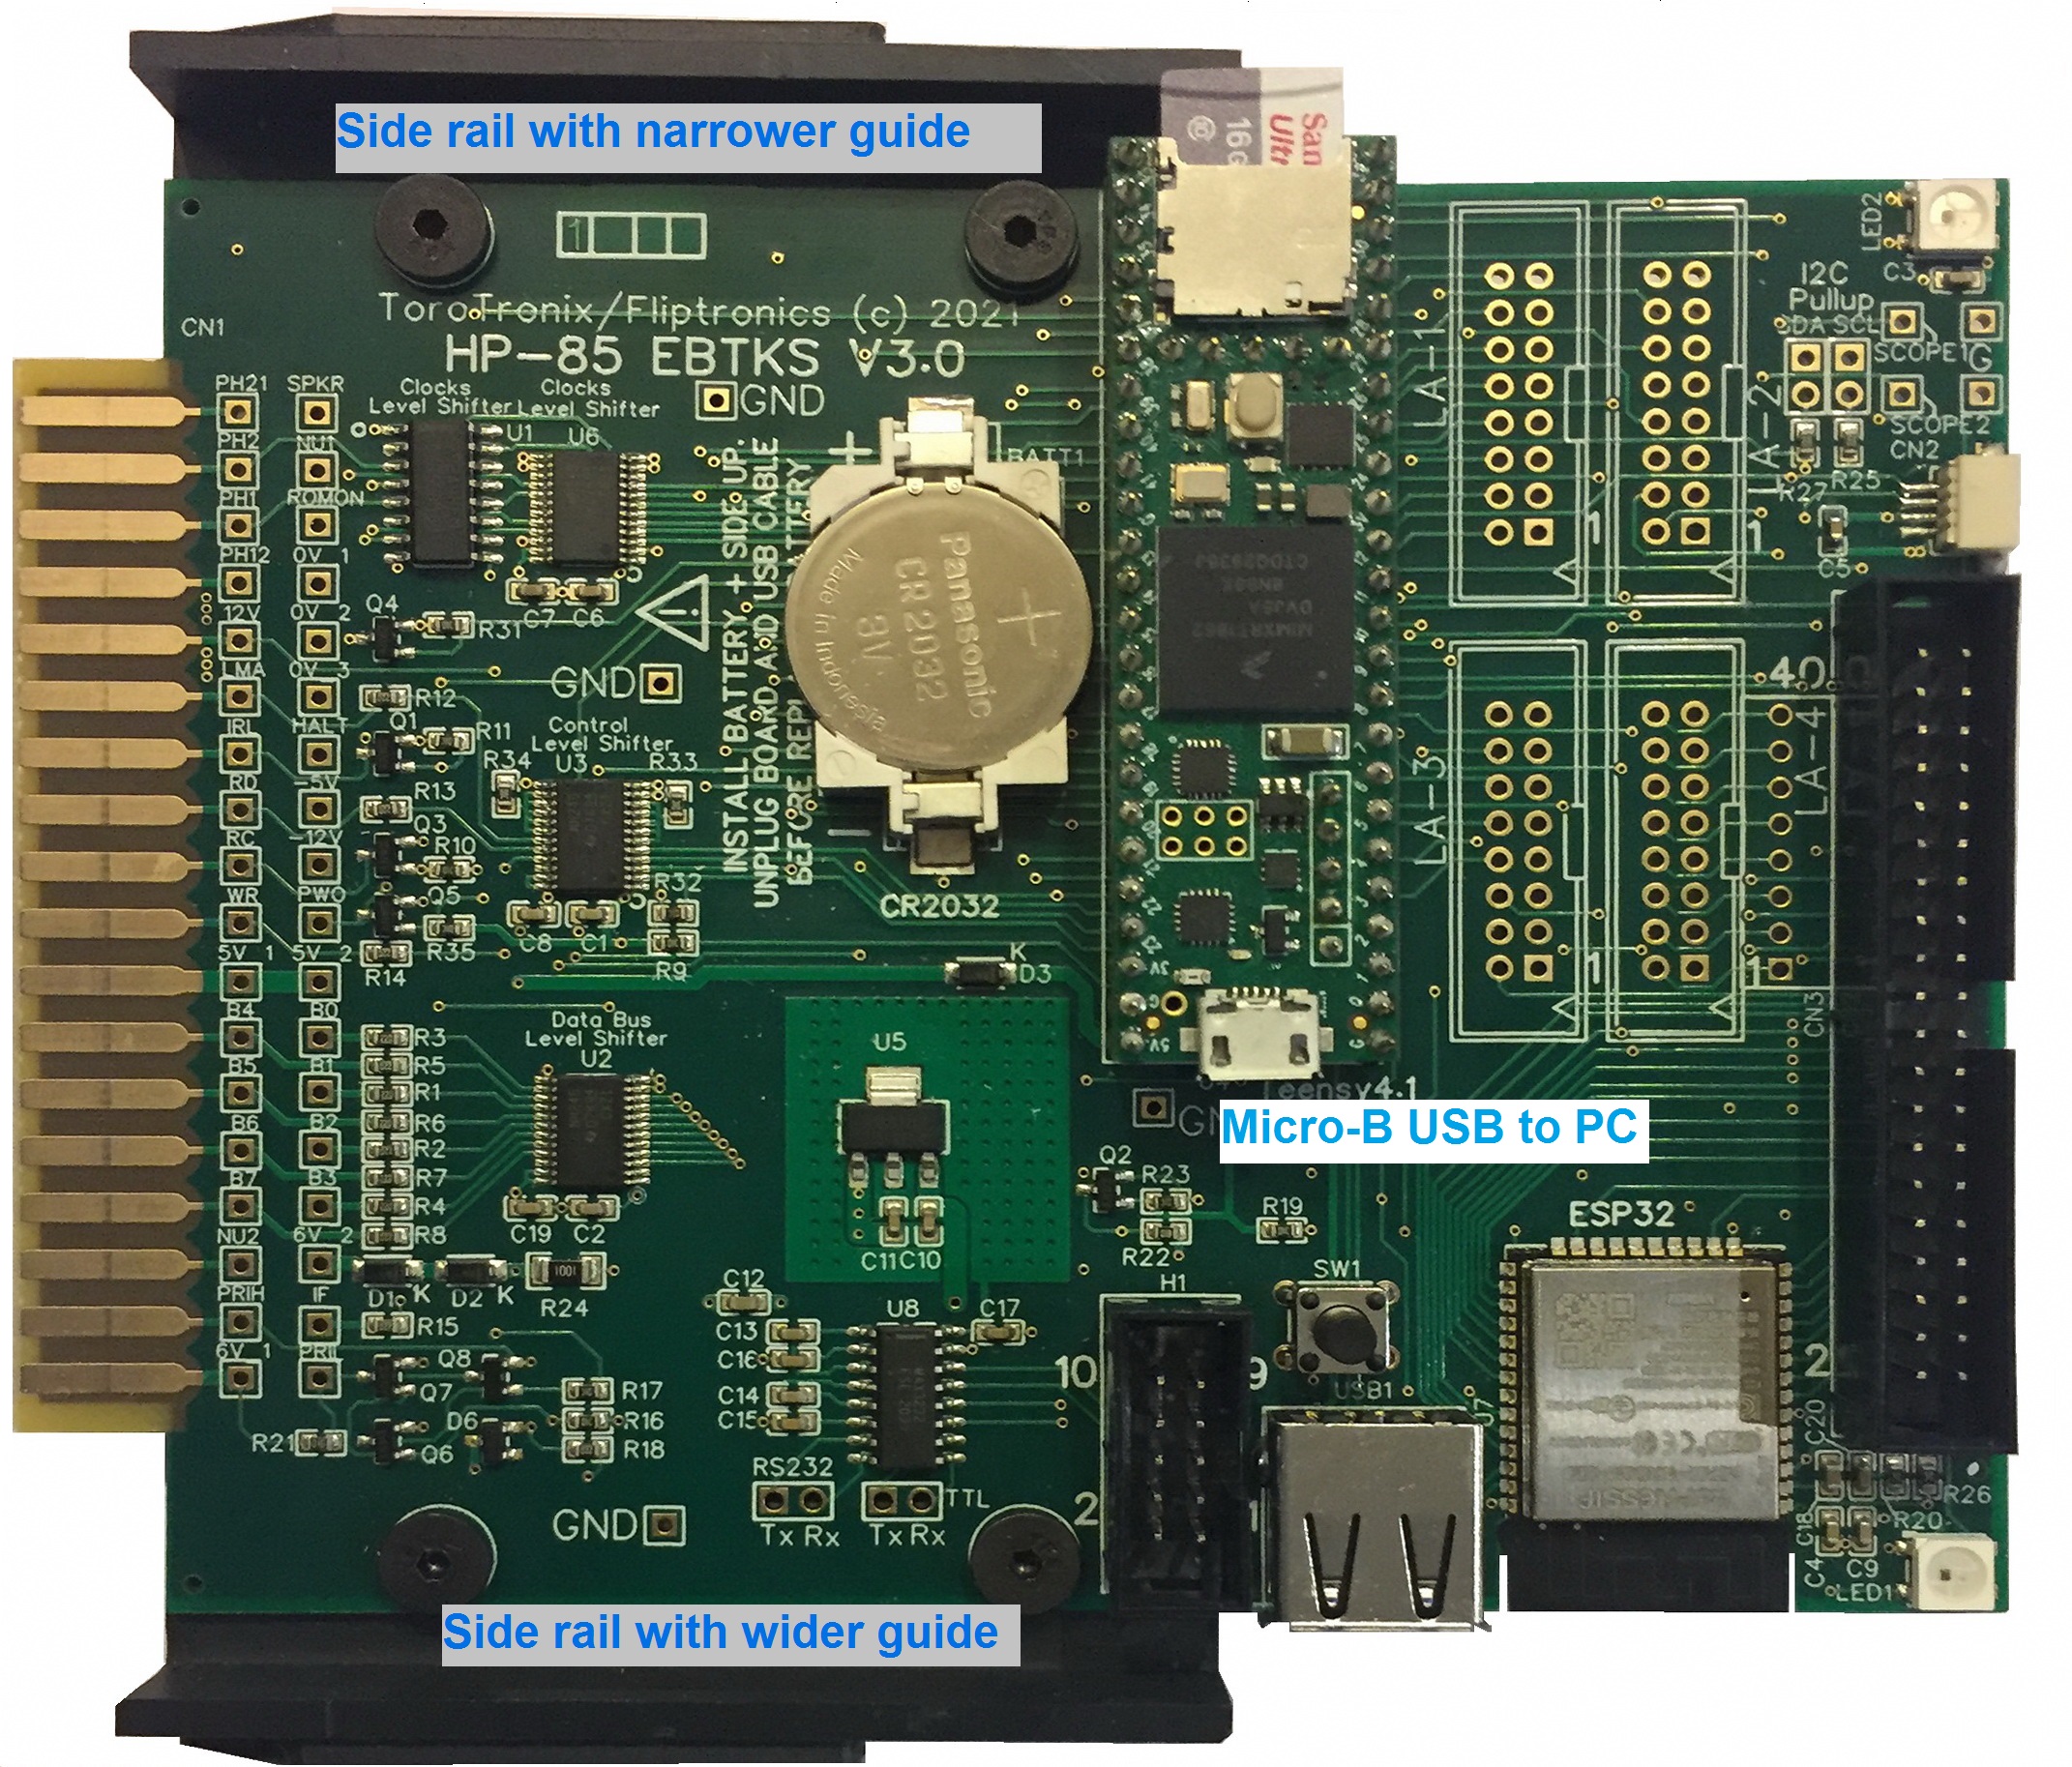
You will need a USB cable that on one end plugs into your computer (typically a USB-A plug), and the other end must have a Micro-B USB plug, that matches the Micro-B USB socket that is at one end of Teensy.
There is a USB-A socket on the main EBTKS board (bottom edge, near the middle in the picture below). It is not involved in the update process. Please ignore it.
Follow this link to the Teensy Downloader and follow the install instructions for your computer. It is available for Windows, Linux and Mac computers.
As I only have a Windows PC for doing downloads, I will describe how the firmware update is done with my computer. Hopefully others with either Linux or MAC will document their experience on their systems, and send them to Philip, to update this section of the documentation to cover these other systems
Windows
- On the Windows page for Teensy Loader there are two downloads:
Teensy Loader Program
LED Blink, Both Slow & Fast
In all of the following description, the references to the white button are to the physical button on the Teensy, not the image on the Teensy.exe program, which is for a different model of Teensy.
Windows Short Form
Download Teensy.EXE and the test blink programs in a ZIP file
Connect the Teensy on EBTKS to your computer with a USB cable to the Micro-USB Connector
Load and run the Fast Blink .HEX program for Teensy 4.1
Put Teensy.EXE into Auto mode
Load and run the Slow Blink .HEX program for Teensy 4.1
Download firmware for EBTKS and program it into the Teensy 4.1
Windows Long Form
The Teensy downloader program is supplied as Teensy.exe , there is no setup process as the downloaded program is self contained and ready to run. Store it in an appropriate directory on your Windows PC, and if you want, create a desktop link as you would for any other runnable program.
As shown on the download page on the PJRC website for Teensy.exe , the program has a very simple user interface. Here is how to use it with EBTKS:
The Teensy needs to have a connection to your computer from the Micro- USB connector on the Teensy 4.1 , see above for the location. After making the connection for the first time, you may have to wait about a minute for the Windows operating system to retrieve the appropriate device drivers. This mean that your computer must be connected to the Internet.
The "LED Blink, Both Slow & Fast" test is a .ZIP file. Unpack the .Zip, it will put all the files in a directory named blink_both. Follow the instruction to check that Teensy.exe works on your system by connecting the Teensy on your EBTKS board via the Micro-USB connector to your computer. Teesny can remain plugged into the EBTKS board, and EBTKS can be either plugged into the HP85 with power on or off, or EBTKS can just be sitting on your desk. It is powered via the USB cable.
- There are 38 files in the unpacked blink_both directory. The only two that you will be using are:
blink_fast_Teensy41.hex
blink_slow_Teensy41.hex
At the step where you are instructed to push the white button on Teensy, a red LED will turn on. It is near the Micro-USB connector. Soon after the red LED comes on the Teensy.exe program will turn the two arrow icons green. In the Teensy.exe program select "File", and navigate to the first test program "blink_both\blink_fast_Teensy41.hex". The left green arrow which points down is the program icon. When you click it, the red LED will get brighter for about a 1/4 of a second during the programming operation. When this step is complete the brightness of the red LED is lowered to its initial brightness.
Now click the green arrow that points to the right. This causes the Teensy to reboot and run the fast blinking program. The red LED turns off. Now click the gray-ed out "Auto button". It should turn green. Go to the "File" menu, and select blink_slow_Teensy41.hex . Press the white button on the Teensy and it should automatically program and reboot the Teensy. Sometimes the white button press needs to be done more than once.
If all the above was successful, you can now proceed to program the Teensy with the EBTKS firmware, which you can download from Downloads page .
Linux
Notes from Mike G. (thanks Mike). Please read all of this section before starting the update process:
This is what I did on my Ubuntu 20.04LTS system to update the firmware on EBTKS
The Teensy flash utility can be found here: https://www.pjrc.com/teensy/loader_linux.html as a tar.gz file
There are two versionsDownload Teensy Program (32 bit)
Download Teensy Program (64 bit)
Download the appropriate one for your system
Open a terminal window and change directory to the folder containing the downloaded tar.gz file
Extract the file with tar, then copy the 00-teensy.rules file to the directory shown:
tar xf teensy_linux64.tar.gz
sudo cp 00-teensy.rules /etc/udev/rules.d/
Reload udev and is required when making config changes
sudo udevadm control –reload
Connect a USB cable between the Micro-B USB connector on Teensy and your computer
Mike G wrote that he unplugged the Teensy from EBTKS. Philip believes this should not be necessary. Since the pins on Teensy are delicate, avoiding unplugging it from EBTKS is desireable. Also, to avoid a possible issue with unpowered USB hubs, and performance limitations with some USB hubs, don’t connect via a USB hub. Connect directly to a USB port on your computer. Per the note at the top of this page, if you have been using a terminal emulator via this USB port on Teensy, this connection must be closed. Before unplugging the Teensy module, please try the following in the order presented, and report back to Philip what your experience is, so that this documentation can be updated to the least complex procedure.
EBTKS plugged into your Series80 computer with the power on
EBTKS plugged into your Series80 computer with the power off
EBTKS unplugged from your Series80 computer
Teensy unplugged from EBTKS. Hopefully not needed
Run the Flash utility, you will probably need to press the white button on Teensy after selecting the .hex file (in the next step)
sudo ./teensy
Browse to the EBTKS_Firmware_R23.hex - under operations pick program. Note that the rev number is not going to be R23. At this point you will need to press the white button on Teensy to enter programming mode.
If you had to remove Teensy from EBTKS, reinstall it carefully, taking note of not just the outer 48 pins but also the two stips of 5 pins. The SD Card connector is close to the edge of the main PCB.
If you are reading this and you are a skilled Linux user, please take a little time to read the above update process for Windows to guide you, and then please, please, please write a similar version that is Linux specific, and identifies Linux related commands and things to check that helped you do the update. Send your text to philip for publication here (and the removal of this message). The rest of the Linux community will be very appreciative.
Mac
Waiting for someone to submit this section
Un-Bricking a Teensy 4.1
Usually the above firmware update process works, and the Teensy Loader automatically will erase and reprogram the Flash memory. The fall back is that the loader program will indicate that you need to press the little white button on the Teensy 4.1 module. When you do this, a LED near the micro-USB connector turns on at a low brightness red. Then the Teensy Loader erases and programs the Flash memory. During erase/program the red LED is bright. At the completion of programming the red LED turns off.
A common mistake I make is that I forget to disconnect any terminal emulation program (I use TeraTerm) from the serial-over-USB connection. So before proceeding in this section, make sure that you don’t have a serial connection to Teensy active, as that will block firmware updating.
Under some mostly undefined and rare situations the Teensy 4.1 can become non-responsive after a firmware update. This is usually associated with either a failure to complete the update process, or during firmware development when new bugs are being added to the code. The indication of this situation is the inability to update the firmware even when following the above instructions. When Teensy Loader indicates that you should press the little white button, the red led does not turn on or it does not remain on in the low brightness mode allowing progress to the erase and program steps. After repeated tries, you are unable to update or restore the firmware. A common term for this type of condition is that something is “bricked”. Teensy 4.1 has a backup backup plan.
When Teensy 4.1 is bricked, follow this procedure:
Turn the Series80 computer (HP85A/B, HP86A/B, HP87/87XM) power off or turn the power off and unplug EBTKS. You do not need to unplug the Teensy 4.1 module from EBTKS, and really, you shouldn’t because the pins are fragile, or the Teensy 4.1 is permanently soldered into EBTKS.
Connect the Teensy 4.1 to your PC/Mac/Linux system with the normal USB cable used for firmware updates. Start up the Teensy Loader
and turn off “Auto” mode (Auto icon is dark).
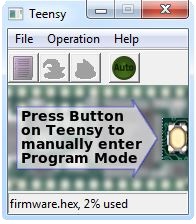
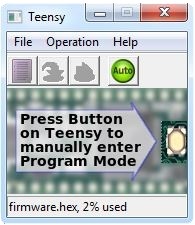
On the file menu, open HEX file, select the EBTKS firmware file. The rest of the Teensy Loader program window should show the message “Press Button on Teensy to manually enter Program Mode”Press and hold the the white button on Teensy 4.1 for 15 seconds plus-or-minus 2 seconds. (i.e. from 13 to 17 seconds). At 13 seconds the red LED will flash at low brightness to let you know that 13 seconds has occurred. When this happens, release the button. Depending on the state of the Flash memory, there may be up to 10 seconds of the red LED being on at low brightness. This is followed by high brightness for 20 to 30 seconds. Finally, the red LED will turn off, and an orange LED near the white button will slowly flash. Teensy 4.1 has now been restored to its original factory settings.
Click the white button to initiate programming. The Teensy Loader will change to this view
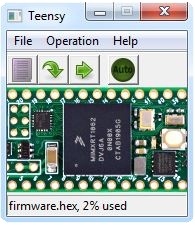
and the red LED will be on at low brightness. You can now click the the down pointing green arrow which will update the firmware on Teensy 4.1 (during the programming the red LED will be bright).
Finally click the green arrow that is pointing to the right to re-boot Teensy 4.1. To indicate that the firmware has been updated, the orange LED will give three very short blinks every 10 seconds. Click the dark auto icon to switch back to auto mode for the Teensy Loader
If you unplugged EBTKS, you can now plug it back into the Series80 computer.