Working with CONFIG.TXT
In the root directory of the SD Card there is a file named CONFIG.TXT . It contains all the configuration information for EBTKS. This file is read when the Series80 computer starts up, and all the configuration is completed before the Series80 computer presents its first prompt to the user. The file format is JSON, and as such, it depends on a very specific format for the various entries, and the way that sections are nested. At the time of writing this page of the documentation, the best way to make changes to CONFIG.TXT is to do the editing and format verification on you PC, as there is no convenient way to do it directly on the Series80 computer.
Validating CONFIG.TXT |
|
Settings for Series80 model and Boot messages |
|
Configuring the emulated Tape Drive |
|
Select the directory for ROM images |
|
Configuring which ROMs are enabled. LISTROMS keyword |
|
Disk Drive emulation overview |
|
How the msus$ strings refer to disk drives |
|
Mapping of Disk configuration to msus$ |
|
Level 1, specifying the HPIB Select code |
|
Level 2, specifying the HPIB Device number |
|
Level 3, specifying the drives and LIF files |
|
A condensed view of the Disk Drives section of CONFIG.TXT |
|
Printer output to a file |
|
Automatically run a program at startup |
|
Traditional run Autost from emulated tape drive and tape |
|
Initial commands are stored in a string in CONFIG.TXT |
|
Initial commands are stored in a batch file that is specified in CONFIG.TXT |
|
Configuring Extended Memory for HP 85B, HP86 and HP87 computers |
|
Setting StartBank parameter for HP85B with no EMC modules |
|
Setting StartBank parameter for HP85B with one or more EMC modules |
|
Setting StartBank parameter for HP86A/B, HP87/87XM |
|
A complete example of CONFIG.TXT |
Before you get started
As mentioned above, the CONFIG.TXT file is in JSON format. The EBTKS reader and parser expect the file to be syntactically correct, and since it is processed during system startup, if there are errors (a missing comma, non-matching curly-brace) the failure won’t be reported, but your system won’t start up correctly. Fortunately, there is a JSON file format checker available on-line that can be used to validate that any edits that you make to this file haven’t broken any rules.
So, let’s get comfortable with using the format checker, before we make any changes, so you will know what the results should be if you have made a mistake, or if you did your edits correctly.
Copy the CONFIG.TXT file from the SD Card to your desktop/laptop computer, and open the file in a text editor, like notepad (on a windows PC). There is also an example of CONFIG.TXT for a HP85A at the bottom of this page.
Open this link in a browser: ArduinoJson Assistant
Set the configuration as shown:
Processor: STM32
Mode: Serialize
Output type: Stream
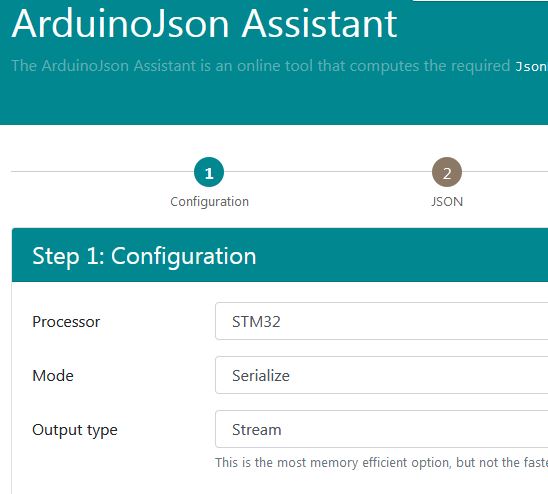
Then click the button labeled “Next: JSON”
Select all the text in the text box labeled “Output” box, and delete it.
(on a Windows PC, click inside the box, type Ctrl-A to select all, then the delete key)
In the text editor that is showing CONFIG.TXT, select all the text and copy it to the clipboard.
(on a Windows PC, click anywhere on the text in the editor and type Ctrl-A to select all, then type Ctrl-C to copy it all to the clipboard)
Paste the clipboard contents into the ArduinoJson Assistant Output box.
(on a Windows PC, click anywhere inside the box, and type Ctrl-V)
Scroll the “Output” box to the top, and it should look something like this:
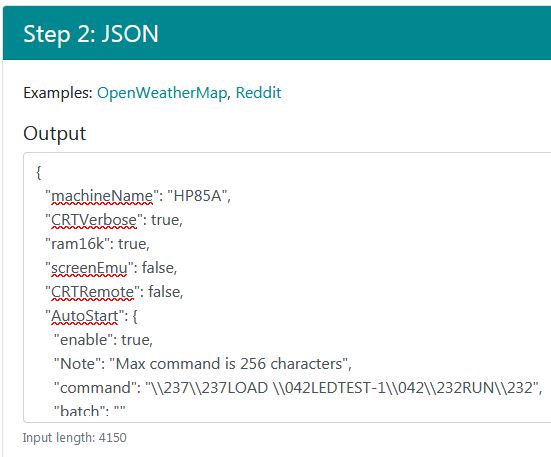
Don’t worry about the squiggly red lines under some of the text. On my browser this is just automatic spell checking getting confused. You may or may not see this depending on your operating system and browser. It does not indicate an error.
In particular, note that at the bottom left corner of the Output box, it shows “Input length: 4150” and the text is black/gray. This indicates that there are no errors in the JSON formatting.
Now delete one of the commas at the end of a line, or a quote character, or a colon.
You should instantly see the message at the bottom left corner of the Output box turn red, and indicate that there is an error, and where the error has occurred. Restore the deleted character and the Input length message should return.
As just demonstrated, you can edit the CONFIG.TXT directly within the ArduinoJson Assistant window, after you copy CONFIG.TXT to that window. This will give you continuous live updates of whether the text is JSON syntax valid. When you are done editing (and the syntax has been validated), you can select all the text with Ctrl-A , copy to clipboard Ctrl-C, and then paste it back into notepad (or whatever) with Ctrl-V. Then save the updated CONFIG.TXT with Ctrl-S. The updated CONFIG.TXT should then be copied back to the root directory of the SD Card
When making any edits to CONFIG.TXT you must at a minimum do the above test after you have completed your edits. While getting the “Input length” message indicates there are no syntax errors in your CONFIG.TXT file, you still need to be very careful of all file pathnames, and spelling of parameter values, since the ArduinoJson Assistant will not catch those types of errors. All text values must be quoted. The true and false parameters values must not be quoted, and they are checked by ArduinoJson Assistant.
JSON format is an ASCII file of lines of text which are typically comprised of a quoted field name, followed by a value. If the field name is not recognized, the rest of the line is ignored. The purpose of these unrecognized field names is to guide you in editing the file.
A future version of the JSON parser that EBTKS uses supports common C language inline
comments such as // and may be used in a future version of CONFIG.TXT
Example unrecognized field names are:
Unrecognized field name |
Where seen |
|---|---|
“Note” |
AutoStart section |
“Comment” |
HPIB diskdrives section |
“Description” |
ROM section |
OK, now let’s look at the various sections of CONFIG.TXT
System Settings
1   "machineName": "HP85A",
2   "CRTVerbose": true,
3   "ram16k": true,
4   "screenEmu": true,
5   "CRTRemote": true,
The first line (“machineName”) specifies the Series80 model number. The EBTKS firmware uses this information to enable certain features and to check some of the setting specified in the CONFIG.TXT file
“HP83” |
“HP9915A” |
“HP85A” |
“HP85AEMC” |
“HP85B” |
“HP9915B” |
“HP86A” |
“HP86B” |
“HP87” |
“HP87XM” |
Line |
Explanation |
|---|---|
2 |
If true, the extended Boot Message is sent to the Series80 CRT. This includes which ROMs are active, and the associations between msus$ and LIF Files |
3 |
For the HP85A only, EBTKS can provide 16 kb of RAM if this parameter is set true. |
4 |
Under development, always set true at this time |
5 |
Under development, always set true For HP85A/B and false for HP86/87 |
Tape Drive
1 "tape": {
2   "enable": true,
3   "filepath": "/tapes/tape1.tap"
4 },
To help you decide about this, please see Tape Drive Strategies with EBTKS
Line |
Explanation |
|---|---|
1 |
This is the configuration section for the tape drive emulation. |
2 |
Controls whether the section is enabled, which is only allowed on HP85A and HP85B. The whole section has no effect if this parameter is set to false. If this section is enabled, the real tape drive in the HP85A or HP85B must be disabled, which can be done by unplugging the two Flat-Flex cables to the tape drive. |
3 |
Specifies the directory path and file name for the LIF Image file that represents an emulated tape. |
4 |
This is the end of the configuration section. A trailing comma is required if this section is followed by another section at the same logical indent level |
ROMs Section
EBTKS can support up to 20 Option ROMs, four of which are the AUXROMs, which must always be present. The rest are optional. Option ROM 000 is built into all Series80 computers. All other option ROMs are bank- switched into the same address space, so only one can be active at any time. It is likely that some will always be required for the HP85A if you want to use the Disk Drive emulation (rom320B and rom321B), and some should not be enabled because they are pre-installed in the computer (HP85B usually has 3 Option ROMs pre-installed). The ROMs section of the CONFIG.TXT file is a nested structure. The outer part specifies that it is the ROM section, and the default directory on the SD Card where all the ROM images are stored. The inner part of the ROM section starts with [ and ends with ]. Here is the outer section, which you will probably never need to change.
1 "optionRoms": {
2   "directory": "/roms85/",
3   "roms": [
4
5    Multiple ROM entries (see next section), each of which
6    ends with a comma except the last ROM entry
7
8   ]
9 },
Line |
Explanation |
|---|---|
1 |
This is the configuration section for the Option ROMs. |
2 |
The default directory for the ROM images is /roms85/ |
3 |
Start of the inner section |
5 |
The inner sections go here, each is 6 lines long, and all end with a comma except the last one. |
8 |
End of the inner section |
9 |
End of the Option ROMs section. A trailing comma is required if this section is followed by another section at the same logical indent level |
ROM Entries
For each Option ROM, there is an entry within the ROM Section,
described above.
If the entry is disabled (enable set to false),
then it does not consume any memory in EBTKS. Enabled ROMs each
consume 8k bytes, from a memory region that has pre-allocated room for
18 ROMs. Four of these must always be the AUXROMs. The remaining 14
can be used for any combination of Option ROMs. Another restriction on
the number of ROMs that can be enabled is that for the HP85A/B there
can be no more than 14 Option ROMs. For the HP86/87 it is 15 Option
ROMs. When counting ROMs, the built in ROMs must be include, and
although EBTKS requires 4 AUXROM ROMs, they only count as 1 in this
calculation of the system bases restriction (14 or 15) but they do
count as 4 ROMs with regard to the allocated memory for 18 total. If
you do the math, you will see that room for 18 ROMs is just enough.
To summarize the above:
For an HP85A ROMs 000 and the AUXROMs count as 2 total, allowing for up to 12 additional Option ROMs.
For an HP85B ROMs 000, 300 (I/O), 320(Mass Storage), 321(EDisk) pre installed and AUXROMs counts as 5, allowing for up to 9 additional Option ROMs.
For an HP87 ROMs 000, 001 (87 Graphics), 320(Mass Storage) pre installed and AUXROMs counts as 4, allowing for up to 10 additional Option ROMs.
For an HP87XM ROMs 000, 001 (87 Graphics), — needs to be checked —
In general, you should only enable the ROMs you need, as enabling ROMs you don’t need will slow down some of the Series80 computer functions. Another very important rule is that you must not enable two copies of the same ROM. This could happen if your Series80 has a ROM draw, the EPROM module or PRM-85 plugged in (which should not be needed, since EBTKS can provide the ROMs), or if they are pre- installed on the computer’s main board, which is the case for all Series80 computers except the HP85A.
The order of the ROM entries does not matter.
If you are not sure which ROMs are pre-installed on your Series80 computer, edit the CONFIG.TXT file so that all the ROMs are disabled except for the four AUXROMs. Then start your Series80 computer and enter the command
LISTROMS 1
and it will list the installed ROMs.
Note: For the AUXROMs, it will only list the first AUXROM, Octal 361.
Example ROM Entry
1 {
2   "Note": "For 85B floppies and 5, 10 MB hard disk. Use with rom321B, can be used on 85A",
3   "description": "85B Mass Storage",
4   "filename": "rom320B",
5   "enable": true
6 },
Line |
Explanation |
|---|---|
1 |
Start of a ROM entry |
2 |
Documentation text about the entry, so you don’t have to remember what each ROM number means |
3 |
The functional name of the ROM |
4 |
File name for the ROM image. This is appended to the directory specified in the outer section. See line 2 in the previous section. These files must be exactly 8192 bytes in length |
5 |
Whether to enable the ROM. Either true or false, without quotes. Note that there is no trailing comma, as this is the last line at this level within this block |
6 |
End of a ROM entry |
Disk Drives
EBTKS can support multiple emulated disk drives. Currently two types are supported:
Floppy disks with 1040 data blocks (266,240 bytes, usually just referred to as 256 kb) not including the directory area
Hard disks with 18832 data blocks (4,820,992 bytes, usually referred to as 5 MB) not including the directory area
The disk emulation is dependent on a limited functionality HPIB emulation that is also implemented by EBTKS. In particular the HPIB emulation only provides sufficient functionality for the disk and printer emulation, but does not implement a physical HPIB, and there is no HPIB physical connector for you to connect other HPIB devices. The emulated HPIB behaves like an HPIB controller (HP82937A), and so standard HP software Option ROMs like the Mass Storage ROM (320 Octal) and the I/O ROM (300 Octal) can communicate with it, and can’t tell that there is no physical HP82937A implemented by EBTKS.
By default the real HP82937A is shipped with a select code of 7, and
EBTKS is designed to co-exist with one being plugged in. You might
want to do this if you have real disk drives or you may be using HPIB
to control electronic test equipment or data acquisition products.
To avoid conflict, by default the EBTKS emulated HPIB uses
select code 3.
Understanding the msus$ strings
HP disk drives that connect to the Series 80 computers via HPIB are organized into three levels:
HPIB Select Code
Device number on the selected HPIB Select Code
Drive Drive number that is contained in the specified Device number
By default, EBTKS uses HPIB Select Code 3. All testing, documentation, and start-up assume this, and no testing has been done with any other select code for EBTKS.
Physically this is implemented as follows:
The HPIB Select Code is associated with a specific HPIB interface plugged into the back of the Series80 computer (HP 82937A)
The Device is a box with power supply and one or more disk drives. The box connects to the HPIB interface via a HPIB cable
Within the Device box there are one or more Disk drives, usually numbered as Unit 0, 1, …
In Series80 BASIC, specific drives are referenced with a msus$ string. The format is “:Dsdu”, where s, d, and u are
s - The Select Code
d - The Device Number
u - The Unit Number
Therefore, “:D300” refers to HPIB Select code 3 (EBTKS default), Device box 0, Unit 0. In EBTKS, all this is emulated, but the end result is that you use the same msus$ string as you would with physical HPIB interface, cable, disk drive box, and the disk drives within it.
Examples of physical HPIB disk drive products from HP include the 9121, 9122, 9133, 9135.
Disk Drives Configuration
Just as the msus$ implements a 3 level hierarchy to get to the specific disk drive unit, the CONFIG.TXT file similarly uses a 3 level JSON structure to achieve the same thing. There is a 1-to-1 mapping between the msus$ and the layout of this section of CONFIG.TXT
Disk Drives, Level One
The first level specifies the emulated HPIB interface, and it only has one parameter, the select code.
1 "hpib": {
2   "select": 3,
3   "devices": [
4
5     Multiple Device sections, each start with { and end with }
6     There is a comma after each } , except for the last one.
7
8   ]
9 }
Line |
Explanation |
|---|---|
1 |
Start of the HPIB entry |
2 |
Specifies the Select Code for the Emulated HPIB interface |
3 |
The start of an array (list) of devices, indicated by the [ character |
5 |
The Devices list (equivalent to a Disk Drive case with power supply and one or more drives) is made up of one or more sections, each starting with { and ending with } |
6 |
Without showing the content, an example array would be {}, {}, {}, {} . Note that there is no trailing comma after the last Device section |
8 |
The closing ] indicates the end of the array of devices |
9 |
End of a HPIB entry |
Disk Drives, Level Two
The second level is an array (list) of Devices (equivalent to a disk drive box that has one or more disk drives). As described in level one (above), each entry starts with a { and ends with }. If an entry is followed by another entry, there is a separating comma as seen on line 12.
 1 {
 2   "Comment": "All blocks must have different device numbers",
 3   "type": 0,
 4   "device": 0,
 5   "enable": true,
 6   "drives": [
 7
 8     Multiple Disk Drive sections, each start with { and end with }
 9     There is a comma after each } , except for the last one.
10
11   ]
12 },
Line |
Explanation |
|---|---|
1 |
Start of a Device entry |
2 |
A reminder that device numbers need to be unique. |
3 |
Specifies the type of Disk drives being emulated. All the Drives for a given Device must be the same type. Type 0 is a 256 kb floppy, type 4 is a 5 MB hard drive (all emulated, no hardware other than EBTKS) |
4 |
The Device number that must be unique. Can be 0 through 7 |
5 |
The Device can be enabled/disabled. If disabled, it will disable all the Disk Drives for this Device. Equivalent to turning the power off to the Disk Drive box |
6 |
The start of an array (list) of Disk Drives, indicated by the [ character |
8 |
The Disk Drive array is a list of the Disk Drives within a Device (Disk Drive Box). Each Disk Drive is specified with a block that starts with { and ends with } |
9 |
Without showing the content, an example array would be {}, {}, {}, {} . Note that there is no trailing comma after the last Disk Drive section |
11 |
The closing ] indicates the end of the array of Disk Drives |
12 |
End of a Device entry |
Disk Drives, Level Three
The third level is an array (list) of Disk Drives (that are within a Disk Drive Box). As described in level two (above), each entry starts with a { and ends with }. If an entry is followed by another, there is a separating comma. So, at last we get to the Disk Drives (emulated)
1 {
2   "Comment": "msus$ 300",
3   "unit": 0,
4   "filepath": "/disks/BETAUTIL.DSK",
5   "writeProtect": false,
6   "enable": true
7 }
Line |
Explanation |
|---|---|
1 |
Start of a Disk Drive entry |
2 |
Document what the msus$ is for this Disk Drive instance. The first digit is the HPIB Select code, the second digit is the Device Number, and the third digit is this specific Disk Drive within the specified Device. Within a specific Device, the Disk drive numbers must be unique, and are between 0 and 3 |
3 |
The Disk Drive Number, 0 through 3 |
4 |
Each Disk Drive must be associated with a file on the SD Card that holds the data of the emulated Disk that is currently loaded into a Disk Drive. If the Drive is a Floppy Disk Drive for example, the specified file represents a Floppy Disk. This line specifies the directory path and file name for the LIF Image file that represents an emulated disk. File names and paths are not case sensitive |
5 |
WriteProtect is a place holder at the time of writing this documentation. It may be implemented some time in the future. Update January 2025: still a place holder |
6 |
Each Disk Drive can be individually enabled. If it is disabled (set this parameter to false), the Disk Drive cannot be enabled until the CONFIG.TXT file is modified and the Series80 computer is rebooted. MOUNTing a LIF file on a disabled Disk Drive will not work. (equivalent to putting a floppy disk in a drive that has the power off) |
7 |
End of a Disk Drive entry |
Disk Drives, putting it all together
Without all the details described above, here is the structure overview of the Disk Drive section of CONFIG.TXT that is listed at the bottom of this page. The indent levels directly relate to the above descriptions.
The description specifies 4 floppy drives with msus$ of 300, 301, 320, 321. Two 5 MB hard drives, but only one is enabled with msus$ of 330, and finally an emulated printer with device number 310 (which is not a msus$). The printer section will be discussed in the next section, but it is referred to here because it is emulated as a device connected to the emulated HPIB, and so appears in the same section as the Disk Drives.
If your browser window is narrow, the text below may be clipped on the right side. If this happens, there is a scroll bar at the bottom of the page that you can adjust to see all the text
 1 "hpib": {
 2   "select": 3,
 3   "devices": [
 4     {  Device 0, Type 0 (Floppies), LIFs are in /disks/
 5       [ An Array of Floppy Disk Drives
 6         {Floppy drive 0, msus$ is 300,
 7                       LIF file is /disks/BETAUTIL.DSK} ,
 8         {Floppy drive 1, msus$ is 301,
 9                       LIF file is /disks/85Games1.dsk}
10       ]   end of an array of floppies
11     },
12     {  Device 2, Type 0 (Floppies), LIFs are in /disks/
13       [ An Array of Floppy Disk Drives
14         {Floppy drive 0, msus$ is 320,
15                       LIF file is /disks/85Games2.dsk} ,
16         {Floppy drive 1, msus$ is 321,
17                       LIF file is /disks/85GamesMisc.dsk}
18       ]   end of an array of floppies
19     },
20     {  Device 3, Type 4 (5 MB Hard drive), LIFs are in /disks/
21       [ An Array of 5 MB Hard Disk Drives
22         {5 MB Hard Disk drive 0, msus$ is 330,
23                       LIF file is /disks/5MB_scr.dsk} ,
24         {5 MB Hard Disk drive 1, msus$ is 331,
25                       LIF file is -none- because not enabled}
26       ]   end of an array of hard drives
27     },
28     {
29     the HPIB printer is also a device on the emulated
30     HPIB bus. See the next section
31     }
32   ]   end of array of devices
33 }   end of hpib
An example of adding a second 5 MB drive
In the /disks directory, create a new 5 MB blank disk by copying the file /Original_images/Blank_5MB.dsk to /disks and rename it to 5MB_scr2.dsk (or what ever you prefer, changing the reference in CONFIG.TXT to match).
 1 {
 2   "Comment": "All blocks must have the same select and different device",
 3   "type": 4,
 4   "device": 3,
 5   "enable": true,
 6   "drives": [
 7     {
 8       "Comment": "msus$ 330",
 9       "unit": 0,
10       "filepath": "/disks/5MB_scr.dsk",
11       "writeProtect": false,
12       "enable": true
13     },
14     {
15       "Comment": "msus$ 331",
16       "unit": 1,
17       "filepath": "/disks/5MB_scr2.dsk",
18       "writeProtect": false,
19       "enable": true
20     },
21   ]
22 },
The above example is a static creation of a two emulated disk drives.
You will now have two 5 MB drives at “:D330” and “:D331”
You can have up to 4 Disk entries in the drives list, with the last digits being between 0 and 7. They don’t have to be sequential, but there is no reason I can think of for them not to be. See lines 9 and 16.
Disk drives can only be statically created by entries in the CONFIG.TXT file (as the system is started up, each time power is turned on), and can’t be created while the Series80 computer is running. The assignment of a file in /disks to the created emulated drive is also done statically within the CONFIG.TXT file. See lines 10 and 17. While the Series80 computer is running, the assignment of a file to an emulated drive can be changed dynamically with the MOUNT keyword.
The EBTKS Application section also includes More on MOUNT
The following link to a forum discussion may also be instructive: Application Pacs on EBTKS
Printers
EBTKS can support multiple emulated HPIB printers, that take the data that is output to the printer and redirects it to be written to a file on the SD Card. This should not be interpreted as multiple models of HP printers, just multiple instances of very simple text only printers. The emulated printer(s) appear as an HPIB device, and so the configuration is included in the HPIB part of the CONFIG.TXT file, after the disk drive sections. Given the default HPIB select code of 3, the emulated printer has a default device number of 10, and thus the full device number is 310. This should not be confused with a msus$ of 310, but is the reason that in the disk drive section above, we skipped device 1, and used device 0, 2, and 3 to avoid possible confusion.
To use this printer redirection capability, the Printer/Plotter ROM must be enabled.
To activate the redirection of PRINT statements from sending text to the built-in printer, run this command:
PRINTER IS 310
After executing this statement, printer output is appended to the designated file. To return to output going to the built in printer, run this command:
PRINTER IS 2
1 {
2   "Comment": "Device 10 on HPIB select code, i.e. 310",
3   "printer": "",
4   "device": 10,
5   "enable": true,
6   "filepath": "/printers/printfile.txt"
7 }
Line |
Explanation |
|---|---|
1 |
Start of the Printer entry |
2 |
Document what the Device ID is for the Printer. The first digit is the HPIB Select code, the remaining two digits are the device id on that (emulated) HPIB bus |
3 |
This line identifies this section as an emulated printer section, rather than a Disk Drive section. |
4 |
The emulated Printer device number can be 0 to 31, but I recommend 10 to 31 to avoid confusion with Disk msus$ |
5 |
The emulated Printer can be individually enabled. If it is disabled (set this parameter to false), directing print data to the SD Card will not be available. |
6 |
The emulated Printer must be associated with a file on the SD Card that receives the printed text. This line specifies the directory path and file name for that file. File names and paths are not case sensitive |
7 |
End of a Printer entry |
AutoStart
For HP85A and HP85B (Series80 computers with Tape Drives), if a tape cartridge is already in the tape drive when power is turned on, and if the tape contains a program named “Autost” (this is case sensitive), the program will be loaded from the tape and run. If the program is not near the beginning of the tape, this may take quite a while. Even if there is no “Autost” program on the tape (including an EBTKS emulated tape and tape drive), the directory needs to be read, and with that, the CRT is turned off while this occurs (standard behavior of HP85A/B to save power) just as the system is starting up. EBTKS supports this on the emulated Tape drive, but also provides some enhanced capabilities.
The next section describes the 3 different ways EBTKS supports automatic commands at startup. This section describes in detail the actual text in the default CONFIG.TXT and explains what is going on (hopefully).
The following is the standard AutoStart section of CONFIG.TXT for HP85A/B
1 "AutoStart": {
2   "enable": true,
3   "enableTapeAutostart": false,
4   "Note": "Max command is 256 characters",
5   "command":   "SETLED 1,10,0,0@SETLED 2,0,10,0\\232\\241\\240",
6   "command87": "SETLED 1,10,0,0@SETLED 2,0,10,0\\232\\243\\235",
7   "batch": ""
8 },
Line |
Explanation |
|---|---|
1 |
Start of the AutoStart entry |
2 |
Controls whether this section is ignored ( “enable”: false, ) or is used ( “enable”: true, ) |
3 |
For HP85A and HP85B, enables the original HP Autost function. See “Autostart from Tape” below. |
4 |
|
5 |
“command” is a recognized field name, and the remainder of the line is a command that is run at startup, as if typed at the keyboard |
6 |
“command87” and “command85” are not recognized field names, thus the rest of the line is ignore. This allows both startup strings which are different between HP85 and 86/87, to be included in the CONFIG.TXT file. Only the one with the 2 digits removed is used, the other is ignored |
7 |
“batch” can have a filename as its value, and if this is provided, then commands are fetched from the named file |
8 |
End of the AutoStart entry |
Autostart from Tape
To enable the standard Autost program from the emulated tape drive, the parameters “enable” and “enableTapeAutostart” should both be set to true, “command” and “batch” should both be empty strings.
1 "AutoStart": {
2     "enable": true,
3     "enableTapeAutostart": true,
4     "Note": "Max command is 256 characters",
5     "command": "",
6     "batch": ""
7   }
Automatically enter commands from CONFIG.TXT
EBTKS provides 3 mechanisms for running commands automatically at startup:
Run the program “Autost” on the tape drive. Autostart from Tape
Inject characters into the keyboard buffer. This is used (currently) to initialize the LEDs. This is discussed in the rest of this section.
Run a simplistic batch file. Allows unlimited commands, but no looping, no batch variables, no conditionals. Very simplistic.
See the next section Automatically enter commands from a batch fileBatch files are also available for normal use as well. SDBATCH
EBTKS supports initial commands copied from the CONFIG.TXT file onto the CRT and
then run. This is done by pretending to be characters coming from the keyboard
as soon as the Series80 computer has completed booting up. You will actually see
the commands appearing on the CRT when this is done. The command string in
CONFIG.TXT can be up to 256 characters, and must be on a single line. All of the
special keys on the keyboard can be entered by using their 3 digit octal value
preceded by a double back slash.
Here is a link to the Octal codes . When entering octal codes in the “command”: parameter, each
octal code must be preceded by two back slash characters. Since the ENDLINE
character can be used in the string, multi-line commands are possible.
Some common codes to build a command string
Batch files have different rules, see the section below
This example is for the HP85A/B. For the HP86 and 87, the codes are
different.
See Octal codes
Desired Key |
Code to use |
|---|---|
CLEAR (Clear Screen) |
|
-LINE (clear to end of line) |
|
“ (double quote) |
|
ENDLINE |
|
RUN |
|
DOWNCURSOR |
|
\ (backslash) |
|
With EBTKS installed, depending on the setting of CRTVerbose, the CRT may be displaying many lines of text or a clear screen. As you should know, when you type a command, if there are characters on the same line to the right of the end of the command you are typing, it will mess up your command.
For the HP85A/B, you must also make sure that the previous line does not have a character in the last position (character position 32) as that will cause the previous line to be treated as part of the command too. There are a few strategies that could work here:
Clear the screen before entering commands using octal
\\222at the beginning of the command.Clear the current line with “-line” code
\\240, then move down 1 line (\\242) and clear that line as well (\\240), then enter the desired command. So the beginning of “command” would be
“\\240\\242\\240rest of the command”
This sequence assumes the cursor is in column 1, which is true at system start.Roll the screen down two lines, since we know at initial start, the prior two lines (CRT buffer lines 62 and 63) will be blank the beginning of “command” would be
\\237\\237as seen in the example.
To use this version of Autostart, let’s look at an example that uses the third option:
1 "AutoStart": {
2     "enable": true,
3     "enableTapeAutostart": false,
4     "Note": "Max command is 256 characters",
5     "command": "\\237\\237LOAD \\042LEDTEST2\\042\\232RUN\\232",
6     "batch": ""
7   }
The rest of the example is made up of the following pieces
LOAD which is the standard load command
\\042which is the double quote character at the start of a file name for the load commandLEDTEST2 which is the name of the program to be loaded
\\042which is the double quote character at the end of a file name for the load command\\232which is the endline key, thus finishing the LOAD command, and causing the program to be read from the default storage device and placed into memory. With default settings of EBTKS, this would fetch the LEDTEST2 program from “:D300”RUN followed by
\\232will now run the program.
Using this form of autostart allows quite complex startup. The command string (including back slashes and octal numbers) must be no longer than 256 characters. After converting each \\xxx octal numbers to a single byte, the resultant string must be no longer than 96 characters which is 3 lines on an HP85A/B screen. The use of the @ character for a multi statement lines and the ENDLINE character for multiple lines allows for quite complex automatic startup. The 96 character limit does not apply if the command contains ENDLINE characters, in which case the constraint applies to the segments separated by ENDLINEs.
Automatically enter commands from a batch file
EBTKS supports initial commands from a batch file that is specified in the CONFIG.TXT file. As detailed in the previous section, you must be aware of what might already be on the screen that could interfere with the command that are in the batch file. The same 3 strategies are available. There are three differences between the batch file approach to autostart and the single string described in the previous section.
You are not limited to 256 characters
Octal constants only have a single backslash \ preceding octal key codes
You don’t need to use \232 for the end of line character, or \042 for the double quote characters. Normal ends of lines in the batch file will be interpreted as the end line that the HP85 expects.
To use this version of Autostart, let’s look at an example:
1 "AutoStart": {
2     "enable": true,
3     "enableTapeAutostart": false,
4     "Note": "Max command is 256 characters",
5     "command": "",
6     "batch": "autoexec.bat"
7   }
The contents of the batch file could be:
1 LOAD "LEDTEST-1"
2 RUN
Unlike the batch files on Windows OS systems, this batch capability is very simple. Just the sequential transfer of text.
Extended Memory Control (EMC)
EBTKS can provide up to 256 kB of Extended Memory for HP85B, HP86A/B,
HP87/XM.
(256 kB at the time of writing this documentation. This may
change in the future).
On the HP85B the only use for this memory is
the Electronic Disk. Given the SD Card based disk emulation provided
by EBTKS, this is probably of no practical use. On the HP86 and HP87
computers, EMC increases the available memory for program and data.
Extended Memory is not support on the HP85A (unless a circuit
modification is made which would make it compatible with the HP85B in
this regard, but as for the HP85B, this would be of little utility).
Extended memory is measured in Banks which are 32 kB each, so 256 kB of memory is 8 Banks. You can enable any number of banks from 0 to 8. The NumBanks parameter sets the number of Banks of Extended Memory that EBTKS will provide.
Setting the starting bank number StartBank requires some minor calculation. Follow these steps:
StartBank for HP85B with no additional EMC modules
Set the EMC section of CONFIG.TXT in the root directory of the SD Card to the following
1 "EMC": {
2   "enable": true,
3   "NumBanks": 8,
4   "StartBank": 3
5 }
StartBank for HP85B with additional EMC modules
Unplug EBTKS from your system and plug in the extended memory modules you plan to use with EBTKS (64 kB or 128 kB). Note: the 16K RAM module from HP is not compatible with HP85B computers.
The HP85B comes with 32kB of extended memory as Bank 2.
Start your calculation with an initial value of 3 and add 2 for each 64kB modules that you are installing, and add 4 for each 128kB modules that you are installing. The result is the calculated value. For example, if you plug in one 64kB module and one 128kB module, the calculation is 3+2+4 = 9
The calculated value of step 3 is the value to be used for StartBank parameter. Update the CONFIG.TXT file on the SD Card with this value, and plug the SD Card into the socket on the Teensy processor module.
But, see below for The EMC Program , that does not require editing the CONFIG.TXT on another computer.EBTKS can now be plugged into your HP85B.
If you unplug any Extended memory modules, you will have to repeat this calculation. Well, actually, if you unplug a 128kB module, just subtract 4 from the previous calculated StartBank. If you unplug a 64kB module, subtract 2 from the previous calculated StartBank.
Confirm that you have the settings correct by doing a using the DISC FREE A, B, “:D000” command (see page 274 of the HP85B Owner’s Manual). The reported available EDisc size is given in disk blocks. These are each 256 bytes. Take the value, and divide by 4 to get kB of EDisc. It should be close to the expected Extended memory provided by your Extended Memory modules and the configured size of EBTKS provided Extended Memory.
StartBank for HP86A/B, HP87/HP87XM
Unplug EBTKS from your system and plug in the extended memory modules you plan to use with EBTKS (64 kB or 128 kB). Note: the 16K RAM module from HP is not compatible with HP86/87 computers.
Start your HP86/87 computer and type the LIST command to see the amount of memory available. The value should be close to a multiple of 32 kB. For example, on an HP87 that comes with 32 kB installed, the displayed number is 28467 (on my HP87). So this is close to 32768. If I had a 128 kB module plugged in, the number would be close to 159539.
To calculate the closest multiple of 32 kB, divide the number provided by the LIST command by 32768. For example: 159539 / 32768 results in 4.8687 , so the closest multiple is 5 time 32768. What we care about is the 5 that we just calculated. You can use your HP86/87 computer to do these calculations.
Take the result from the prior step, and add 1. In our example we get 6
The result of step 4 is the value to be used for StartBank parameter. Update the CONFIG.TXT file on the SD Card with this value, and plug the SD Card into the socket on the Teensy processor module.
But, see below for The EMC Program , that does not require editing the CONFIG.TXT on another computer.EBTKS can now be plugged into your HP86/87 with the Extended memory modules.
If you unplug any Extended memory modules, you will have to repeat this whole procedure. Well, actually, if you unplug a 128 kB module, just subtract 4 from the previous calculated StartBank. If you unplug a 64 kB module, subtract 2 from the previous calculated StartBank.
Confirm that you have the settings correct by doing a LIST command. The reported available memory should be greater by 32768 times NumBanks.
1 "EMC": {
2   "enable": true,
3   "NumBanks": 8,
4   "StartBank": 2
5 }
The EMC Program
The EMC program is provided on the default drive on MSUS$ “:D300”. It can edit the CONFIG.TXT file to change the EMC related parameters. After changing the parameters, the computer must be re-started, for the changes to take effect.
LOAD "EMC"
RUN

The program has four functions, activated by the function keys F1 to F4
F1 |
Enable/Disable EBTKS Extended Memory |
F2 |
Set the StartBank number |
F3 |
Set the number of Banks provided by EBTKS. 0 to 8 |
F4 |
Search the Extended Memory address space to identify Banks of memory |
Pressing F1 will toggle EMC support
Follow the StartBank calculation instructions in the above sections for 85B or 86/87
Press F2 and enter the calculated StartBank value.
Decide how much EMC memory you want EBTKS to provide. The units are banks of 32 kB each. The value can range from 0 (no EMC memory from EBTKS) to 8 banks which is 256 kB , and is equivalent to two HP82909A modules.
Press F3 and enter the desired number of banks of EMC memory provided by EBTKS.

After changing any of F1, F2, F3, the changes are not recognized until the computer is restarted. Exit the EMC program (the PAUSE key), and then type the keyword BOOT, and the END LINE key. This will restart the computer.
Press F4 to start a search for EMC memory. The program write a test pattern to each of the 32 possible banks.

After it has finished writing the test patterns, it then tries reading them back.

Here we see the writing of the test pattern to the last 3 possible banks (29, 30, and 31), Then we see the program reading back the test patterns. For bank 1 (which is provided by the 85B, 86A, and 87), we see that it found the data previously written. The same occurs for banks 2 through 6, which are the 5 banks provided by EBTKS. The remaining banks (7 through 31) will just read back junk, as there is no EMC memory at those addresses.
(While the above picture just shows GOT and then blank, this is an artifact of how this picture was created. On an actual HP8x computer, it is usually 6 graphic characters. Regardless, it isn’t the value written, so there is no EMC memory after bank 6)
Here is an example of CONFIG.TXT
If your browser window is narrow, the text below may be clipped on the right side. If this happens, there is a scroll bar at the bottom of the page that you can adjust to see all the text
{
  "machineName": "HP85A",
  "CRTVerbose": true,
  "ram16k": true,
  "screenEmu": true,
  "CRTRemote": true,
  "tape": {
    "enable": true,
    "filepath": "/tapes/tape1.tap"
  },
  "optionRoms": {
    "directory": "/roms85/",
    "roms": [
      {
        "description": "Service ROM 340 AUXROM Aware",
        "filename": "rom340aux",
        "enable": false
      },
      {
        "description": "Assembler ROM",
        "filename": "rom050",
        "enable": false
      },
      {
        "Note": "Do not enable on HP85B as this ROM may be built in on mainboard",
        "description": "I/O ROM",
        "filename": "rom300B",
        "enable": false
      },
      {
        "description": "MATRIX ROM",
        "filename": "rom260",
        "enable": false
      },
      {
        "Note": "For original 85A floppies, disable rom317, rom320B, rom321B",
        "description": "Mass Storage",
        "filename": "rom320",
        "enable": false
      },
      {
        "Note 85A": "EBTKS requires this for emulated 5, 10 MB hard disk. Must also enable companion rom321B. Can be used on 85A",
        "Note 85B": "Do not enable on HP85B as this ROM is built-in on mainboard",
        "description": "85B Mass Storage",
        "filename": "rom320B",
        "enable": true
      },
      {
        "Note 85A": "EBTKS requires this companion to rom320B. Can be used on 85A",
        "Note 85B": "Do not enable on HP85B as this ROM is built-in on mainboard",
        "description": "EDisk",
        "filename": "rom321B",
        "enable": true
      },
      {
        "Note": "For SS/80 disk, with real HPIB and real SS/80 disk. Use with rom320B, rom321B",
        "description": "Extended Mass Storage",
        "filename": "rom317",
        "enable": false
      },
      {
        "description": "Advanced Programming",
        "filename": "rom350",
        "enable": true
      },
      {
        "description": "Printer/Plotter",
        "filename": "rom360",
        "enable": true
      },
      {
        "description": "AUXROM Primary 2021_06_25",
        "filename": "rom361",
        "enable": true
      },
      {
        "description": "AUXROM Secondary 1 2021_06_25",
        "filename": "rom362",
        "enable": true
      },
      {
        "description": "AUXROM Secondary 2 2021_06_25",
        "filename": "rom363",
        "enable": true
      },
      {
        "description": "AUXROM Secondary 3 2021_06_25",
        "filename": "rom364",
        "enable": true
      }
    ]
  },
  "hpib": {
    "select": 3,
    "devices": [
      {
        "Comment": "All blocks must have different device numbers",
        "type": 0,
        "device": 0,
        "enable": true,
        "drives": [
          {
            "Comment": "msus$ 300",
            "unit": 0,
            "filepath": "/disks/EBTKS_1.0_85.dsk",
            "writeProtect": false,
            "enable": true
          },
          {
            "Comment": "msus$ 301",
            "unit": 1,
            "filepath": "/disks/85Games1.dsk",
            "writeProtect": false,
            "enable": true
          },
          {
            "Comment": "msus$ 302",
            "unit": 2,
            "filepath": "/disks/Floppy_scr.dsk",
            "writeProtect": false,
            "enable": true
          }
        ]
      },
      {
        "type": 0,
        "device": 2,
        "enable": true,
        "drives": [
          {
            "Comment": "msus$ 320",
            "unit": 0,
            "filepath": "/disks/85Games2.dsk",
            "writeProtect": false,
            "enable": true
          },
          {
            "Comment": "msus$ 321",
            "unit": 1,
            "filepath": "/disks/85GamesMisc.dsk",
            "writeProtect": false,
            "enable": true
          }
        ]
      },
      {
        "Comment": "All blocks must have the same select and different device",
        "type": 4,
        "device": 3,
        "enable": true,
        "drives": [
          {
            "Comment": "msus$ 330",
            "unit": 0,
            "filepath": "/disks/5MB_scr.dsk",
            "writeProtect": false,
            "enable": true
          },
          {
            "Comment": "msus$ 331",
            "unit": 1,
            "filepath": "",
            "writeProtect": false,
            "enable": false
          }
        ]
      },
      {
        "Comment": "Device 10 on HPIB select code, i.e. 310",
        "printer": "",
        "device": 10,
        "enable": true,
        "filepath": "/printers/printfile.txt"
      }
    ]
  },
  "AutoStart": {
    "enable": true,
    "enableTapeAutostart": false,
    "Note": "Max command is 256 characters",
    "command":   "SETLED 1,10,0,0@SETLED 2,0,10,0\\232\\241\\240",
    "command87": "SETLED 1,10,0,0@SETLED 2,0,10,0\\232\\243\\235",
    "batch": ""
  },
  "EMC": {
    "Comment": "Startbank add 2 for each 82908A (64 kB), add 4 for each 82909A (128 kB)",
    "enable": false,
    "NumBanks": 2,
    "StartBank": 3
  }
}