Application Notes
Using EBTKS in multiple Series80 Computers
Lots of wise text explaining multiple SD Cards. Need for different base file set for 85A/B and 86/87.
SD Card contents differences between 85A/B and 86/87
Lots of wise text explaining differences in the default floppy, and the /TOK directory and also the default media assignments
Editing CONFIG.TXT with BASIC programs
Lots of wise text explaining about need to reboot, and need to be very, very, careful not to break JSON formatting
Setting up TeraTerm
TeraTerm is a free terminal emulator program that can run on a PC and connect via a USB cable to the Teensy 4.1 module on EBTKS. The usb port on the Teensy 4.1 is called the console port.
Connecting EBTKS Teensy Console port to your computer
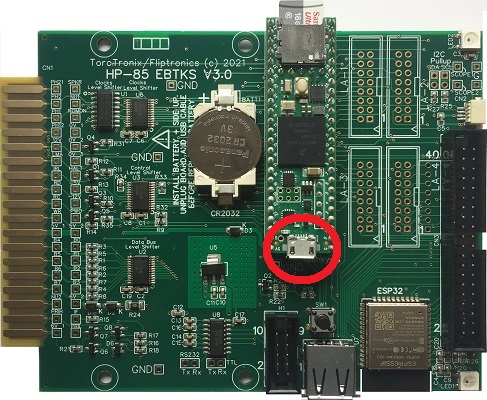
To use the console, you need to connect a USB micro-B cable to the non SD Card end of the Teensy 4.1 module to your PC/MAC, and run a terminal emulator program. My preference is TeraTerm.
The Console commands are documented here EBTKS Console
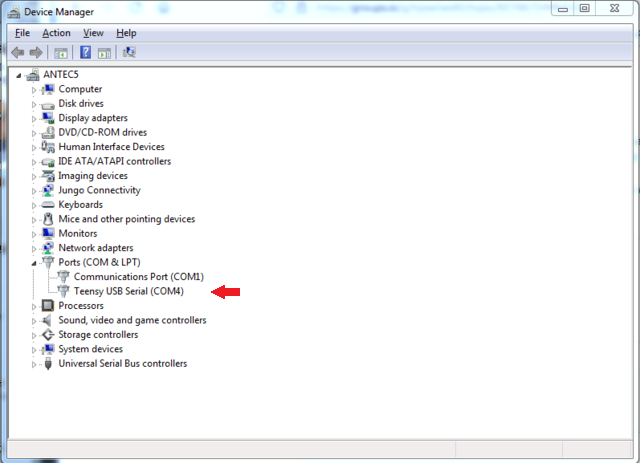
When you connect the USB cable to the PC (assuming EBTKS is powered by being in a powered Series 80 computer) Windows will go to the Internet and find the device driver for the Teensy 4.1 virtual COM port, and then install it.
You can check that it was successful by using the device manager. You should see some thing like this (showing COM4 was assigned):
Setting up TeraTerm for EBTKS
EBTKS also has a set of built in diagnostic tool (primarily for Philip’s use) that are minimally listed and poorly documented here: EBTKS Console
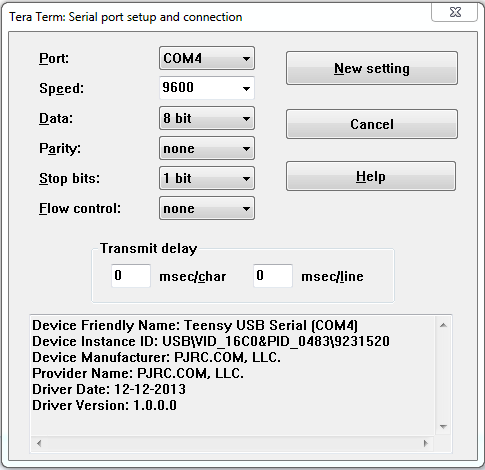
These commands are available over a virtual serial link over USB. There is a micro USB connector on the Teensy module at the other end from the SD Card. You will need a terminal emulator program on your PC/MAC that connects to the COM port that will become available after the connection is made. The protocol is vanilla 9600 Baud 8N1. I use TeraTerm, which is a free terminal emulator.
After installing TeraTerm, on the menu line, select File->New Connection and select Serial and the virtual COM port that Teensy provides over the USB connection, as shown in thabove picture. This will require that Teensy is plugged into your Series 80 computer, and power is on.
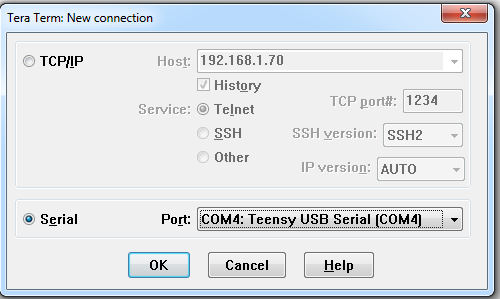
Then, continue with configuring this connection:
On the Setup -> Terminal page, do this:

On the Setup -> Serial Port page, do this:
With your Series 80 computer + EBTKS running, you should get an EBTKS console prompt like this:
EBTKS>
The Console commands are minimally documented here EBTKS Console
Changing the Coin Cell Battery
EBTKS has a CR2032 coin cell battery that supplies power to the time- of-day clock (and date) when the main power is off. Power is only taken from the battery when your Series 80 computer is off. Battery life is typically 6 months to a year. (sorry, better battery life would have been possible with better electronic design, but support of the real time clock was a late addition to the design, and was not something we focused on.) The battery can be easily replaced by first unplugging EBTKS from your computer. If you have a USB cable connected to the Teensy module, disconnect this too. Note that the battery is installed with the positive side up. Using a small screwdriver at the negative end of the battery holder, place it in the small slot at the edge of the battery, and the battery will pop out. Install a new battery by sliding it towards the positive contact in the battery holder, and press down for the battery to snap it into place. The following section describes how to set the clock after replacing the battery.
Expected Battery life
Battery life for very low power applications like maintaining the Real Time Clock (RTC) depends on
The battery’s capacity, usually measured in mAh , and
The current drawn by the RTC when the main power is un-available, (the computer is turned off), usually measured in uA
Two example batteries are the CR2032 (as used on EBTKS) and a pair of Alkaline AA bateries (we need a pair because we need 3.0 volts, nominal).
Not all of the battery’s capacity is useable, as the output voltage drops over the life of the battery, and as its capacity is consumed.
The Panasonic CR2032 capacity is 225 mAh, which is equal to 225,000 uAh
The chemistry is Lithium Ion, and we can assume 80% of capacity is useable, which is
180,000 uAh
Duracell Alkaline AA battery is about 2300 mAh, which is equal to 2,300,000 uAh
The chemistry is Alkaline, and we can assume 80% of capacity is useable, which is
1,840,000 uAh
Although two AA bateries are need to get 3.0V , we don’t get to double the
available capacity, since the batteries are in series.
The data sheet for the IMXRT1062DVJ6A (or B) which is the processor on the Teensy 4.1 module used in EBTKS says that typically the RTC draws 20 uA. There is no maximum specified, and I have measured 40 to 80 uA for some EBTKS boards.
Estimated battery life of CR2032 if current drawn is 20 uA
180,000 uAh / 20 uA = 9000 Hours = 375 Days
Estimated battery life of CR2032 if current drawn is 80 uA
180,000 uAh / 80 uA = 2250 Hours = 94 Days
Estimated battery life of 2 x AA if current drawn is 20 uA
1,840,000 uAh / 20 uA = 92,000 Hours = 3833 Days = 10 years
Estimated battery life of 2 x AA if current drawn is 80 uA
1,840,000 uAh / 80 uA = 23,000 Hours = 958 Days = 2.6 years
If you want to use batteries like AA or AAA instead of the CR2032 batteries,
consider a battery holder like these from DigiKey:
2368-23-BH2-4-ND or 2368-23-BH3-2-ND.
The wires from these battery holders should be soldered to the pads on the PCB for the CR2032 socket. The soldering should be done with EBTKS unplugged, and the CR2032 removed. After installing the batteries, check your work with a multimeter. See the next section for setting the date and time.
If you are uncomfortable with making this modification, I’ll be glad to do it for you, but you will have to buy the battery holder and pay shipping each way. It would probably better to just ask in the forum for some help, and give your location.
Setting Time and Date
Currently there is no way to adjust the Time or Date from the Series 80 computer, but it can be done with the EBTKS Console.
Follow this link Setting up TeraTerm to see how to configure TeraTerm for communications with EBTKS, or as a guide to configure some other terminal emulator.
Once you have your terminal emulator set up, and connected to the EBTKS, you should get a prompt for a command:
EBTKS>
Setting the Date
To change the date, the setdate command requires the full month/day/year as shown in these examples:
EBTKS>setdate MM/DD/YYYY
EBTKS>setdate 03/19/2023
Setting the Time
To change the time, the settime command requires both hours and minutes as shown in these examples:
EBTKS>settime HH:MM
EBTKS>settime 14:35 (2:35 pm)
If you want to get the exact second, set the minutes part to the next minute, and type the enter key when the new minute starts.
Adjusting the Date and Time
Sometimes it is much easier to adjust the time or date rather than entering it as above. To facilitate this, EBTKS has two adjustment modes:
adj hours (the initial default mode)
adj min
In both modes, the “U” and “D” characters change either the hours or minutes up/down by 1, and then display the new date or time. After typing U/D you still need to type the enter key.
EBTKS> 0
EBTKS Control commands - not case-sensitive
0 Help for the help levels 1 Help for Display Information 2 Help for Diagnostic commands 3 Help for Directory and Time/Date Commands 5 Help for Developers 6 Help for Demo 8 Simple Logic Analyzer for emulated 1MB5
The time is 19:03:28 on Sunday the 19th of March 2023
EBTKS> u Now 20:03 EBTKS> u Now 21:03 EBTKS> d Now 20:04 EBTKS> d Now 19:04 EBTKS> adj min Up/Down adjust (U/D) is now minutes EBTKS> d Now 19:03 EBTKS> d Now 19:02 EBTKS> d Now 19:01 EBTKS> u Now 19:02 EBTKS> u Now 19:03 EBTKS> u Now 19:04 EBTKS> adj hour Up/Down adjust (U/D) is now hours EBTKS> 0
EBTKS Control commands - not case-sensitive
0 Help for the help levels 1 Help for Display Information 2 Help for Diagnostic commands 3 Help for Directory and Time/Date Commands 5 Help for Developers 6 Help for Demo 8 Simple Logic Analyzer for emulated 1MB5
The time is 19:04:42 on Sunday the 19th of March 2023
EBTKS>
More on MOUNT
EBTKS implements Series80 disks and tapes as files that are stored in the /disks/ and /tapes/ directories, respectively. An initial set of associations are provided in CONFIG.TXT
For the HP85 A/B , these are the associations in the default CONFIG.TXT
msus$       Disk image file

":D300"     /disks/EBTKS_1.0_85.dsk      (default Mass Storage drive)
":D301"     /disks/85Games1.dsk
":D302"     /disks/Floppy_scr.dsk
":D320"     /disks/85Games2.dsk
":D321"     /disks/85GamesMisc.dsk
":D330"     /disks/5MB_scr.dsk
Further Reading: Understanding the msus$ strings
You can change these associations “on-the-fly” using the MOUNT command. The associations between a msus$ and the files that represents disks or tapes that you change with MOUNT are temporary, as the CONFIG.TXT file is not modified. So, when you turn off the power to your Series80 computer, these temporary associations are not remembered. When your computer is turned back on, the associations in CONFIG.TXT are restored. You can of course repeat the same MOUNT command to re-establish the same association.
If you want to make the association permanent, then the CONFIG.TXT file needs to be edited. This is documented here: Disk Drives . This description is quite detailed, as the complete management of storage is fairly complex. If you aren’t trying to do anything exotic, the easiest shortcut is to just change the filename in an existing msus$ association. This is described below.
A virtual disk should be located in the /disks/ directory on the SD card, and should have a .dsk extension. Case doesen’t matter, so .DSK is also ok.
Create a temporary association
The 85StandardPac can be found here: “EK_Disks/disks0/85StandardPac”
Copy the file using EBTKS commands
SDCOPY "EK_Disks/disks0/85StandardPac","/disks/85StandardPac.dsk"
Note: Virtual floppy disk images are recognizable by their file length of 264 kB, exact size is 270336.
Note: The example SDCOPY also appended the required file extension.
Confirm the copy with
SDCAT /disks/
and expect to see a line with
85StandardPac.dsk ..... 270336
Copy the file using PC/MAC commands
As an alternative to the above example with SDCOPY , you can copy the disk image using your PC/MAC and use appropriate copy commands (or drag/drop) to copy 85StandardPac from EK_Disks/disks0/ to /disks/ , and add the file extension .dsk
Now that the floppy image is in the right location
Once the file 85StandardPac.dsk is in the /disks/ directory you can use the MOUNT command to associate it with an msus$ that has already been setup in CONFIG.TXT.
Note: you can’t create new msus$ while EBTKS is running.
MOUNT ":D302" , "/disks/85StandardPac.dsk",0

CAT ":D302"

[ Volume ]: StdPac
Name        Type  Bytes   Recs
MOVING      PROG    256     40
AMORT       PROG    256     17
POLY        PROG    256     29
SIMUL       PROG    256     47
ROOTS       PROG    256     19
CURVE       PROG    256     55
FPLOT       PROG    256     22
DPLOT       PROG    256     43
HISTO       PROG    256     36
TEACH       PROG    256     27
CALEND      PROG    256     22
BIORHY      PROG    256     21
TIMER       PROG    256     30
COMPZR      PROG    256     56
SKI         PROG    256     20
MUSIC       DATA    256     44
This is a temporary association. When the 85A (or any other Series 80 computer) is restarted, “:D302” will be associated with whatever is specified in in CONFIG.TXT
The above MOUNT command could be re-issued, to re-mount the disk. You won’t need to repeat the prior copy operation.
- Note: Many of the standard software PACs found in EK_Disks/disks0/ expect the PAC disk to be
the default. So after the PAC is associated with an msus$ , you will also need to give a command like
MSI ":D302"
Create a permanent association
This is done by editing the CONFIG.TXT file.
The copy step is optional, Create a temporary association
Appending the “.DSK” to the disk image file is optional.
- Edit CONFIG.TXT and make the association permanent.
At about line 111, you should find a section that looks exactly like this:
1    {
2      "Comment": "msus$ 302",
3      "unit": 2,
4      "filepath": "/disks/Floppy_scr.dsk",
5      "writeProtect": false,
6      "enable": true
7    }
Change it to this (the only change is line 4)
1    {
2      "Comment": "msus$ 302",
3      "unit": 2,
4      "filepath": "/EK_disks/disks0/85StandardPac",
5      "writeProtect": false,
6      "enable": true
7    }
- NOTE:
Only the “filepath” line (4) was changed
85StandardPac did not need to be moved
Didn’t need the file extension .dsk to be added
Shows up in the boot screen messages if you scroll the text up
Association happens at boot time, no need for MOUNT
Permanent, until you edit this section of CONFIG.TXT
CAT ":D302"
will give the same results as in the prior section.
MOUNT: Additional reading
How to check the current file association to a msus$ MEDIA$
The mode flag for the MOUNT command MOUNT
To get a deeper understanding of this part of CONFIG.TXT, start reading at Disk Drives and read down till you get to the Printers heading.
If you want to be more adventurous with CONFIG.TXT, you really should start at the top of Working with CONFIG.TXT and read/understand everything up to the System Settings heading. Then read the section relevant to task you want to do
Setting up EBTKS and the CP/M module
Apparently, EBTKS and the CP/M module can co-exist, and EBTKS can provide the disk services that CP/M requires. This was never a design goal.
This would not have been possible without the help of:
Martin Hepperle: CPM-Usage.pdf
All contributors to: Forum File Section for CP/M
Donation of a CP/M module: TubeTimeUS on Twitter
61K CP/M Version 2.2
HP BIOS Version A   Revision 1.00

Copyright (c) 1982 by Hewlett Packard
Copyright (c) 1980 by Digital Research

A>
Using the Service ROM with EBTKS
This is discussed in the following forum article: